文章实时采集
Flume和Kafka完成实时数据采集
采集交流 • 优采云 发表了文章 • 0 个评论 • 435 次浏览 • 2020-08-06 16:17
Flume和Kafka完成实时数据采集
写在前面
在生产环境中,通常将水槽和Kafka结合使用. 可以同时使用它们两者来采集实时日志信息非常重要. 如果您不懂水槽和卡夫卡,可以先检查一下我写的关于这两部分的知识. 让我们再次学习,这部分操作也是可能的.
实时数据的采集面临一个问题. 我们如何生成实时数据源?因为我们可能想直接获取实时数据流不是那么方便. 我之前写了一篇有关实时数据流的python生成器的文章,文章地址:
您可以先看看如何生成实时数据...
在想什么? ?如何开始? ?
分析: 我们可以从数据流开始. 数据首先位于Web服务器中. 我们的访问日志由Nginx服务器实时采集到指定文件中. 我们从该文件采集日志数据,即: webserver => flume => kafka
Web服务器日志存储文件位置
此文件的位置通常由我们自己设置
我们的网络日志的存储目录为:
/home/hadoop/data/project/logs/access.log下面
[hadoop@hadoop000 logs]$ pwd
/home/hadoop/data/project/logs
[hadoop@hadoop000 logs]$ ls
access.log
[hadoop@hadoop000 logs]$
水槽
做水槽实际上是写一个conf文件,所以面临选择的问题
来源选择?频道选择?选择接收器?
在这里,我们选择exec源存储通道kafka sink
怎么写?
按照前面提到的步骤1234
在官方网站上,我们可以找到应如何选择:
1)配置源
exec来源
# Describe/configure the source
a1.sources.r1.type = exec
a1.sources.r1.command = tail -F /home/hadoop/data/project/logs/access.log
a1.sources.r1.shell = /bin/sh -c
2)配置频道
内存频道
a1.channels.c1.type = memory
3)配置接收器
卡夫卡水槽
对于flume1.6版本,请参阅#kafka-sink
a1.sinks.k1.type = org.apache.flume.sink.kafka.KafkaSink
a1.sinks.k1.brokerList = hadoop000:9092
a1.sinks.k1.topic = flume_kafka
a1.sinks.k1.batchSize = 5
a1.sinks.k1.requiredAcks =1
将以上三个组成部分组合在一起
a1.sources.r1.channels = c1
a1.sinks.k1.channel = c1
我们的新文件称为test3.conf
粘贴我们自己分析的代码:
[hadoop@hadoop000 conf]$ vim test3.conf
a1.sources.r1.type = exec
a1.sources.r1.command = tail -F /home/hadoop/data/project/logs/access.log
a1.sources.r1.shell = /bin/sh -c
a1.channels.c1.type = memory
a1.sinks.k1.type = org.apache.flume.sink.kafka.KafkaSink
a1.sinks.k1.brokerList = hadoop000:9092
a1.sinks.k1.topic = flume_kafka
a1.sinks.k1.batchSize = 5
a1.sinks.k1.requiredAcks =1
a1.sources.r1.channels = c1
a1.sinks.k1.channel = c1
我们不会从这里开始,因为它涉及kafka的事情,我们必须首先部署kafka,
Kafka部署
如何部署Kafka? ?
请访问官方网站,我们首先启动Zookeeper流程,然后才能启动kafka服务器
第1步: 启动动物园管理员
[hadoop@hadoop000 ~]$
[hadoop@hadoop000 ~]$ jps
29147 Jps
[hadoop@hadoop000 ~]$ zkServer.sh start
JMX enabled by default
Using config: /home/hadoop/app/zk/bin/../conf/zoo.cfg
Starting zookeeper ... STARTED
[hadoop@hadoop000 ~]$ jps
29172 QuorumPeerMain
29189 Jps
[hadoop@hadoop000 ~]$
第2步: 启动服务器
[hadoop@hadoop000 ~]$ kafka-server-start.sh $KAFKA_HOME/config/server.properties
#外开一个窗口,查看jps
[hadoop@hadoop000 ~]$ jps
29330 Jps
29172 QuorumPeerMain
29229 Kafka
[hadoop@hadoop000 ~]$
如果这部分不是很熟悉,您可以参考
第3步: 创建主题
[hadoop@hadoop000 ~]$ kafka-topics.sh --create --zookeeper localhost:2181 --replication-factor 1 --partitions 1 --topic flume_kafka
WARNING: Due to limitations in metric names, topics with a period ('.') or underscore ('_') could collide. To avoid issues it is best to use either, but not both.
Created topic "flume_kafka".
[hadoop@hadoop000 ~]$
第4步: 启动上一个代理
[hadoop@hadoop000 conf]$ flume-ng agent --name a1 --conf . --conf-file ./test3.conf -Dflume.root.logger=INFO,console
第5步: 启动消费者
kafka-console-consumer.sh --zookeeper hadoop000:2181 –topic flume-kafka
执行上述第五步后,您将收到刷新屏幕的结果,哈哈哈! !
上面的消费者将不断刷新屏幕,这仍然非常有趣!!!
这里的使用者将接收到的数据放在屏幕上
稍后,我们将介绍使用SparkStreaming作为使用者来实时接收数据,并对接收到的数据进行简单的数据清理,并从随机生成的日志中过滤出所需的数据... 查看全部
Flume和Kafka完成实时数据采集
写在前面
在生产环境中,通常将水槽和Kafka结合使用. 可以同时使用它们两者来采集实时日志信息非常重要. 如果您不懂水槽和卡夫卡,可以先检查一下我写的关于这两部分的知识. 让我们再次学习,这部分操作也是可能的.
实时数据的采集面临一个问题. 我们如何生成实时数据源?因为我们可能想直接获取实时数据流不是那么方便. 我之前写了一篇有关实时数据流的python生成器的文章,文章地址:
您可以先看看如何生成实时数据...
在想什么? ?如何开始? ?
分析: 我们可以从数据流开始. 数据首先位于Web服务器中. 我们的访问日志由Nginx服务器实时采集到指定文件中. 我们从该文件采集日志数据,即: webserver => flume => kafka
Web服务器日志存储文件位置
此文件的位置通常由我们自己设置
我们的网络日志的存储目录为:
/home/hadoop/data/project/logs/access.log下面
[hadoop@hadoop000 logs]$ pwd
/home/hadoop/data/project/logs
[hadoop@hadoop000 logs]$ ls
access.log
[hadoop@hadoop000 logs]$
水槽
做水槽实际上是写一个conf文件,所以面临选择的问题
来源选择?频道选择?选择接收器?
在这里,我们选择exec源存储通道kafka sink
怎么写?
按照前面提到的步骤1234
在官方网站上,我们可以找到应如何选择:
1)配置源
exec来源
# Describe/configure the source
a1.sources.r1.type = exec
a1.sources.r1.command = tail -F /home/hadoop/data/project/logs/access.log
a1.sources.r1.shell = /bin/sh -c
2)配置频道
内存频道
a1.channels.c1.type = memory
3)配置接收器
卡夫卡水槽
对于flume1.6版本,请参阅#kafka-sink
a1.sinks.k1.type = org.apache.flume.sink.kafka.KafkaSink
a1.sinks.k1.brokerList = hadoop000:9092
a1.sinks.k1.topic = flume_kafka
a1.sinks.k1.batchSize = 5
a1.sinks.k1.requiredAcks =1
将以上三个组成部分组合在一起
a1.sources.r1.channels = c1
a1.sinks.k1.channel = c1
我们的新文件称为test3.conf
粘贴我们自己分析的代码:
[hadoop@hadoop000 conf]$ vim test3.conf
a1.sources.r1.type = exec
a1.sources.r1.command = tail -F /home/hadoop/data/project/logs/access.log
a1.sources.r1.shell = /bin/sh -c
a1.channels.c1.type = memory
a1.sinks.k1.type = org.apache.flume.sink.kafka.KafkaSink
a1.sinks.k1.brokerList = hadoop000:9092
a1.sinks.k1.topic = flume_kafka
a1.sinks.k1.batchSize = 5
a1.sinks.k1.requiredAcks =1
a1.sources.r1.channels = c1
a1.sinks.k1.channel = c1
我们不会从这里开始,因为它涉及kafka的事情,我们必须首先部署kafka,
Kafka部署
如何部署Kafka? ?
请访问官方网站,我们首先启动Zookeeper流程,然后才能启动kafka服务器
第1步: 启动动物园管理员
[hadoop@hadoop000 ~]$
[hadoop@hadoop000 ~]$ jps
29147 Jps
[hadoop@hadoop000 ~]$ zkServer.sh start
JMX enabled by default
Using config: /home/hadoop/app/zk/bin/../conf/zoo.cfg
Starting zookeeper ... STARTED
[hadoop@hadoop000 ~]$ jps
29172 QuorumPeerMain
29189 Jps
[hadoop@hadoop000 ~]$
第2步: 启动服务器
[hadoop@hadoop000 ~]$ kafka-server-start.sh $KAFKA_HOME/config/server.properties
#外开一个窗口,查看jps
[hadoop@hadoop000 ~]$ jps
29330 Jps
29172 QuorumPeerMain
29229 Kafka
[hadoop@hadoop000 ~]$
如果这部分不是很熟悉,您可以参考
第3步: 创建主题
[hadoop@hadoop000 ~]$ kafka-topics.sh --create --zookeeper localhost:2181 --replication-factor 1 --partitions 1 --topic flume_kafka
WARNING: Due to limitations in metric names, topics with a period ('.') or underscore ('_') could collide. To avoid issues it is best to use either, but not both.
Created topic "flume_kafka".
[hadoop@hadoop000 ~]$
第4步: 启动上一个代理
[hadoop@hadoop000 conf]$ flume-ng agent --name a1 --conf . --conf-file ./test3.conf -Dflume.root.logger=INFO,console
第5步: 启动消费者
kafka-console-consumer.sh --zookeeper hadoop000:2181 –topic flume-kafka
执行上述第五步后,您将收到刷新屏幕的结果,哈哈哈! !

上面的消费者将不断刷新屏幕,这仍然非常有趣!!!
这里的使用者将接收到的数据放在屏幕上
稍后,我们将介绍使用SparkStreaming作为使用者来实时接收数据,并对接收到的数据进行简单的数据清理,并从随机生成的日志中过滤出所需的数据...
Filebeat实时采集Nginx日志
采集交流 • 优采云 发表了文章 • 0 个评论 • 644 次浏览 • 2020-08-06 10:13
说明Filebeat版本为5.3.0
之所以使用Beats系列的Filebeat代替Logstash的原因是,Logstash消耗了太多资源(请忽略那些拥有足够服务器资源的用户)
在官方网站上,Logstash的下载量为89M,而Filebeat的下载量仅为840M,这很明显
Logstash可以配置jvm参数. 经过我自己的调试,内存分配很小,启动缓慢,有时甚至根本无法启动. 如果分配量很大,其他服务将没有资源
对于低配置服务器而言,选择Filebeat是最佳选择,并且既然Filebeat已开始取代Logstash,仍然有必要修改nginx日志格式nginx.config
更改日志记录的格式
log_format json '{ "@timestamp": "$time_iso8601", '
'"time": "$time_iso8601", '
'"remote_addr": "$remote_addr", '
'"remote_user": "$remote_user", '
'"body_bytes_sent": "$body_bytes_sent", '
'"request_time": "$request_time", '
'"status": "$status", '
'"host": "$host", '
'"request": "$request", '
'"request_method": "$request_method", '
'"uri": "$uri", '
'"http_referrer": "$http_referer", '
'"body_bytes_sent":"$body_bytes_sent", '
'"http_x_forwarded_for": "$http_x_forwarded_for", '
'"http_user_agent": "$http_user_agent" '
'}';
access_log /var/log/nginx/access.log json;
filebeat.yml
#=========================== Filebeat prospectors =============================
filebeat.prospectors:
- input_type: log
# Paths that should be crawled and fetched. Glob based paths.
paths:
- /var/log/nginx/*access*.log
json.keys_under_root: true
json.overwrite_keys: true
#-------------------------- Elasticsearch output ------------------------------
output.elasticsearch:
# Array of hosts to connect to.
hosts: ["ip:port","ip:port"]
index: "filebeat_server_nginx_%{+YYYY-MM}"
这里要注意的是
json.keys_under_root: 默认值为FALSE,这意味着我们的json日志将在解析后放置在json密钥上. 设置为TRUE,所有键都将放置在根节点中
json.overwrite_keys: 是否覆盖原创密钥,这是密钥配置. 将keys_under_root设置为TRUE之后,然后将overwrite_keys设置为TRUE以覆盖filebeat默认密钥值
还有其他配置
json.add_error_key: 添加json_error密钥以记录json解析失败错误
json.message_key: 指定解析后放置json日志的键,默认为json,还可以指定日志等.
坦率地说,区别在于配置前的elasticsearch数据如下:
{
"_index": "filebeat_server_nginx_2018-05",
"_type": "log",
"_id": "AWM9sVOkCcRcg0IPg399",
"_version": 1,
"_score": 1,
"_source": {
"@timestamp": "2018-05-08T03:00:17.544Z",
"beat": {
"hostname": "VM_252_18_centos",
"name": "VM_252_18_centos",
"version": "5.3.0"
},
"input_type": "log",
"json": {},
"message": "{ "@timestamp": "2018-05-08T11:00:11+08:00", "time": "2018-05-08T11:00:11+08:00", "remote_addr": "113.16.251.67", "remote_user": "-", "body_bytes_sent": "403", "request_time": "0.000", "status": "200", "host": "blog.joylau.cn", "request": "GET /img/%E7%BD%91%E6%98%93%E4%BA%91%E9%9F%B3%E4%B9%90.png HTTP/1.1", "request_method": "GET", "uri": "/img/\xE7\xBD\x91\xE6\x98\x93\xE4\xBA\x91\xE9\x9F\xB3\xE4\xB9\x90.png", "http_referrer": "http://blog.joylau.cn/css/style.css", "body_bytes_sent":"403", "http_x_forwarded_for": "-", "http_user_agent": "Mozilla/5.0 (Windows NT 10.0; Win64; x64) AppleWebKit/537.36 (KHTML, like Gecko) Chrome/62.0.3202.94 Safari/537.36" }",
"offset": 7633,
"source": "/var/log/nginx/access.log",
"type": "log"
}
}
配置后,它看起来像这样:
{
"_index": "filebeat_server_nginx_2018-05",
"_type": "log",
"_id": "AWM9rjLd8mVZNgvhdnN9",
"_version": 1,
"_score": 1,
"_source": {
"@timestamp": "2018-05-08T02:56:50.000Z",
"beat": {
"hostname": "VM_252_18_centos",
"name": "VM_252_18_centos",
"version": "5.3.0"
},
"body_bytes_sent": "12576",
"host": "blog.joylau.cn",
"http_referrer": "http://blog.joylau.cn/",
"http_user_agent": "Mozilla/5.0 (Windows NT 10.0; Win64; x64) AppleWebKit/537.36 (KHTML, like Gecko) Chrome/66.0.3359.139 Safari/537.36",
"http_x_forwarded_for": "-",
"input_type": "log",
"offset": 3916,
"remote_addr": "60.166.12.138",
"remote_user": "-",
"request": "GET /2018/03/01/JDK8-Stream-Distinct/ HTTP/1.1",
"request_method": "GET",
"request_time": "0.000",
"source": "/var/log/nginx/access.log",
"status": "200",
"time": "2018-05-08T10:56:50+08:00",
"type": "log",
"uri": "/2018/03/01/JDK8-Stream-Distinct/index.html"
}
}
这样看起来很舒服
启动FileBeat
进入Filebeat目录
nohup sudo ./filebeat -e -c filebeat.yml >/dev/null 2>&1 &
更新
如果nginx日志收录中文,则中文将转换为Unicode编码. 如果没有,只需添加escape = json参数.
log_format json escape=json '{ "@timestamp": "$time_iso8601", '
'"time": "$time_iso8601", '
'"remote_addr": "$remote_addr", '
'"remote_user": "$remote_user", '
'"body_bytes_sent": "$body_bytes_sent", '
'"request_time": "$request_time", '
'"status": "$status", '
'"host": "$host", '
'"request": "$request", '
'"request_method": "$request_method", '
'"uri": "$uri", '
'"http_referrer": "$http_referer", '
'"body_bytes_sent":"$body_bytes_sent", '
'"http_x_forwarded_for": "$http_x_forwarded_for", '
'"http_user_agent": "$http_user_agent" '
'}';
access_log /var/log/nginx/access.log json;
消息 查看全部
说明Filebeat版本为5.3.0
之所以使用Beats系列的Filebeat代替Logstash的原因是,Logstash消耗了太多资源(请忽略那些拥有足够服务器资源的用户)
在官方网站上,Logstash的下载量为89M,而Filebeat的下载量仅为840M,这很明显
Logstash可以配置jvm参数. 经过我自己的调试,内存分配很小,启动缓慢,有时甚至根本无法启动. 如果分配量很大,其他服务将没有资源
对于低配置服务器而言,选择Filebeat是最佳选择,并且既然Filebeat已开始取代Logstash,仍然有必要修改nginx日志格式nginx.config
更改日志记录的格式
log_format json '{ "@timestamp": "$time_iso8601", '
'"time": "$time_iso8601", '
'"remote_addr": "$remote_addr", '
'"remote_user": "$remote_user", '
'"body_bytes_sent": "$body_bytes_sent", '
'"request_time": "$request_time", '
'"status": "$status", '
'"host": "$host", '
'"request": "$request", '
'"request_method": "$request_method", '
'"uri": "$uri", '
'"http_referrer": "$http_referer", '
'"body_bytes_sent":"$body_bytes_sent", '
'"http_x_forwarded_for": "$http_x_forwarded_for", '
'"http_user_agent": "$http_user_agent" '
'}';
access_log /var/log/nginx/access.log json;
filebeat.yml
#=========================== Filebeat prospectors =============================
filebeat.prospectors:
- input_type: log
# Paths that should be crawled and fetched. Glob based paths.
paths:
- /var/log/nginx/*access*.log
json.keys_under_root: true
json.overwrite_keys: true
#-------------------------- Elasticsearch output ------------------------------
output.elasticsearch:
# Array of hosts to connect to.
hosts: ["ip:port","ip:port"]
index: "filebeat_server_nginx_%{+YYYY-MM}"
这里要注意的是
json.keys_under_root: 默认值为FALSE,这意味着我们的json日志将在解析后放置在json密钥上. 设置为TRUE,所有键都将放置在根节点中
json.overwrite_keys: 是否覆盖原创密钥,这是密钥配置. 将keys_under_root设置为TRUE之后,然后将overwrite_keys设置为TRUE以覆盖filebeat默认密钥值
还有其他配置
json.add_error_key: 添加json_error密钥以记录json解析失败错误
json.message_key: 指定解析后放置json日志的键,默认为json,还可以指定日志等.
坦率地说,区别在于配置前的elasticsearch数据如下:
{
"_index": "filebeat_server_nginx_2018-05",
"_type": "log",
"_id": "AWM9sVOkCcRcg0IPg399",
"_version": 1,
"_score": 1,
"_source": {
"@timestamp": "2018-05-08T03:00:17.544Z",
"beat": {
"hostname": "VM_252_18_centos",
"name": "VM_252_18_centos",
"version": "5.3.0"
},
"input_type": "log",
"json": {},
"message": "{ "@timestamp": "2018-05-08T11:00:11+08:00", "time": "2018-05-08T11:00:11+08:00", "remote_addr": "113.16.251.67", "remote_user": "-", "body_bytes_sent": "403", "request_time": "0.000", "status": "200", "host": "blog.joylau.cn", "request": "GET /img/%E7%BD%91%E6%98%93%E4%BA%91%E9%9F%B3%E4%B9%90.png HTTP/1.1", "request_method": "GET", "uri": "/img/\xE7\xBD\x91\xE6\x98\x93\xE4\xBA\x91\xE9\x9F\xB3\xE4\xB9\x90.png", "http_referrer": "http://blog.joylau.cn/css/style.css", "body_bytes_sent":"403", "http_x_forwarded_for": "-", "http_user_agent": "Mozilla/5.0 (Windows NT 10.0; Win64; x64) AppleWebKit/537.36 (KHTML, like Gecko) Chrome/62.0.3202.94 Safari/537.36" }",
"offset": 7633,
"source": "/var/log/nginx/access.log",
"type": "log"
}
}
配置后,它看起来像这样:
{
"_index": "filebeat_server_nginx_2018-05",
"_type": "log",
"_id": "AWM9rjLd8mVZNgvhdnN9",
"_version": 1,
"_score": 1,
"_source": {
"@timestamp": "2018-05-08T02:56:50.000Z",
"beat": {
"hostname": "VM_252_18_centos",
"name": "VM_252_18_centos",
"version": "5.3.0"
},
"body_bytes_sent": "12576",
"host": "blog.joylau.cn",
"http_referrer": "http://blog.joylau.cn/",
"http_user_agent": "Mozilla/5.0 (Windows NT 10.0; Win64; x64) AppleWebKit/537.36 (KHTML, like Gecko) Chrome/66.0.3359.139 Safari/537.36",
"http_x_forwarded_for": "-",
"input_type": "log",
"offset": 3916,
"remote_addr": "60.166.12.138",
"remote_user": "-",
"request": "GET /2018/03/01/JDK8-Stream-Distinct/ HTTP/1.1",
"request_method": "GET",
"request_time": "0.000",
"source": "/var/log/nginx/access.log",
"status": "200",
"time": "2018-05-08T10:56:50+08:00",
"type": "log",
"uri": "/2018/03/01/JDK8-Stream-Distinct/index.html"
}
}
这样看起来很舒服
启动FileBeat
进入Filebeat目录
nohup sudo ./filebeat -e -c filebeat.yml >/dev/null 2>&1 &
更新
如果nginx日志收录中文,则中文将转换为Unicode编码. 如果没有,只需添加escape = json参数.
log_format json escape=json '{ "@timestamp": "$time_iso8601", '
'"time": "$time_iso8601", '
'"remote_addr": "$remote_addr", '
'"remote_user": "$remote_user", '
'"body_bytes_sent": "$body_bytes_sent", '
'"request_time": "$request_time", '
'"status": "$status", '
'"host": "$host", '
'"request": "$request", '
'"request_method": "$request_method", '
'"uri": "$uri", '
'"http_referrer": "$http_referer", '
'"body_bytes_sent":"$body_bytes_sent", '
'"http_x_forwarded_for": "$http_x_forwarded_for", '
'"http_user_agent": "$http_user_agent" '
'}';
access_log /var/log/nginx/access.log json;
消息
Openresty + Lua + Kafka实现实时日志采集
采集交流 • 优采云 发表了文章 • 0 个评论 • 590 次浏览 • 2020-08-06 09:06
简介
在许多数据采集方案中,Flume是高性能的日志采集工具. 我相信每个人都知道. 许多人认为Flume是一个组件,可以将它们中的大多数与Flume和Kafka的组合相关联以进行日志采集. 该解决方案具有许多优势,例如高性能,高吞吐量和数据可靠性. 但是,如果我们需要实时采集日志,显然这不是一个好的解决方案. 原因如下:
目前,Flume可以支持对目录中数据文件的实时监视. 某个目录的文件采集完成后,将使用完成的符号进行标记. 如果以后有数据输入此文件,则不会检测到Flume.
因此,我们通常使用这种方案进行计时采集. 只要生成新的数据目录,我们就会将数据文件采集到该目录中.
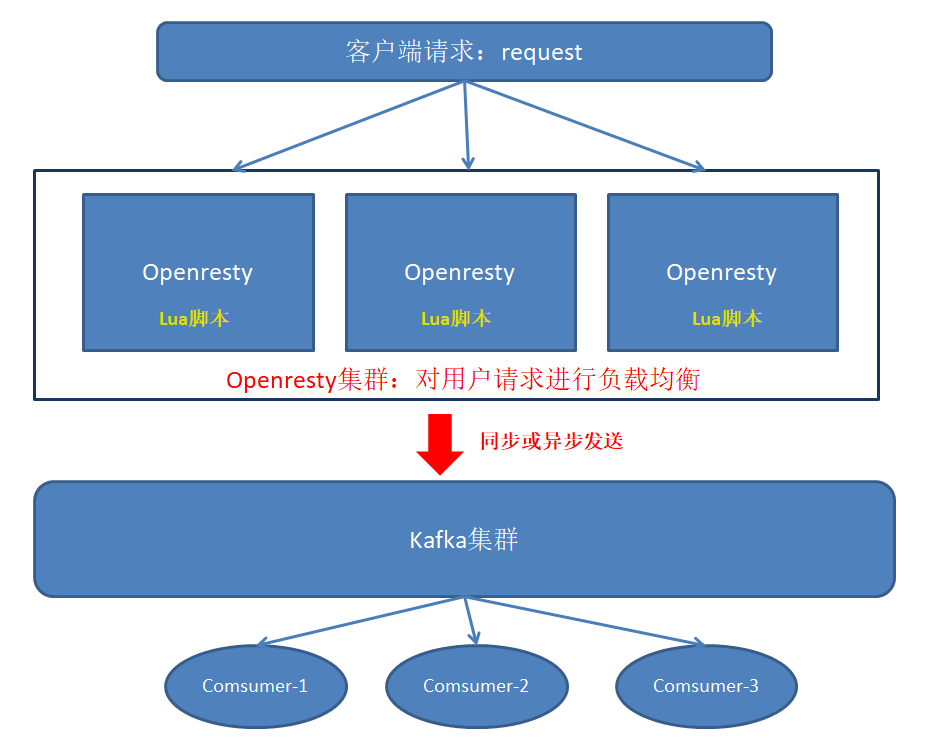
然后,本文将向您介绍基于Openresty + Lua + Kafka的实时日志采集.
要求
很多时候,我们需要实时采集用户的掩埋点数据,然后使用这些数据对用户的行为进行一些实时分析. 因此,第一步当然是解决如何实时采集数据.
我们在这里使用的解决方案是Openresty + Lua + Kafka.
原理介绍
那么什么是Openresty?这是官方报价:
OpenResty是基于Nginx和Lua的高性能Web平台. 它集成了许多复杂的Lua库,第三方模块及其大多数依赖项. 它用于方便地构建可处理超高并发性和高可伸缩性的动态Web应用程序,Web服务和动态网关.
OpenResty通过融合各种精心设计的Nginx模块,有效地将Nginx变成了功能强大的通用Web应用程序平台. 这样,Web开发人员和系统工程师可以使用Lu脚本语言来调动Nginx支持的各种C和Lua模块,并快速构建一个具有10K甚至1000个以上的单机并发连接的高性能Web应用程序系统.
OpenResty的目标是使您的Web服务直接在Nginx服务内部运行,充分利用Nginx的非阻塞I / O模型,不仅用于HTTP客户端请求,甚至用于远程后端(例如MySQL,PostgreSQL) ,Memcached和Redis等具有一致的高性能响应.
简单来说,就是通过Nginx发送客户端的请求(本文指的是用户的行为日志),以将用户的数据传递到我们指定的位置(卡夫卡),为了达到这一要求,我们使用Lua脚本,因为Openresty封装了各种Lua模块,其中之一是子安装Kafka模块,所以我们只需要编写一个简单的脚本即可通过Nginx将用户数据转发到Kafka,以便随后使用数据.
以下是供大家理解的体系结构图:
以下是使用Openresty + Lua + Kafka的优点的简要摘要:
1. 支持多种业务数据,不同的业务数据,只需要配置不同的Lua脚本,就可以将不同的业务数据发送到Kafka中的不同主题.
2. 实时采集用户触发的埋藏点数据
3. 高度可靠的集群. 由于Openresty基于Nginx,因此其群集具有非常高的性能和稳定性.
4. 高并发. 与tomcat,apache和其他Web服务器相比,Nginx的并发性比其他两个要高得多. 在正常情况下处理数万个并发并不难.
接下来让我们做一些实际的工作.
安装Openresty
此示例使用独立部署表单. 成功完成独立部署后,将在独立计算机上构建集群,只是在不同的计算机上执行相同的步骤.
注意: 本实验基于centos7.0操作系统
1. 下载Openresty依赖项:
yum install readline-devel pcre-devel openssl-devel gcc
2. 编译并安装Openresty:
#1.安装openresty:
mkdir /opt/software
mkdir /opt/module
cd /opt/software/ # 安装文件所在目录
wget https://openresty.org/download ... ar.gz
tar -xzf openresty-1.9.7.4.tar.gz -C /opt/module/
cd /opt/module/openresty-1.9.7.4
#2.配置:
# 指定目录为/opt/openresty,默认在/usr/local。
./configure --prefix=/opt/openresty \
--with-luajit \
--without-http_redis2_module \
--with-http_iconv_module
make
make install
3. 安装lua-resty-kafka
因为我们需要通过nginx + lua脚本将数据转发到Kafka,所以在编写lua脚本时需要在lua模块中使用一些Kafka依赖项.
#下载lua-resty-kafka:
cd /opt/software/
wget https://github.com/doujiang24/ ... r.zip
unzip master.zip -d /opt/module/
#拷贝kafka相关依赖脚本到openresty
cp -rf /opt/module/lua-resty-kafka-master/lib/resty/kafka/ /opt/openresty/lualib/resty/
注意: 由于每个人都熟悉Kafka,因此这里不会介绍其安装.
安装Openresty之后,目录结构如下:
drwxr-xr-x 2 root root 4096 Mar 24 14:26 bin
drwxr-xr-x 6 root root 4096 Mar 24 14:26 luajit
drwxr-xr-x 7 root root 4096 Mar 24 14:29 lualib
drwxr-xr-x 12 root root 4096 Mar 24 14:40 nginx
4. 配置文件
编辑/opt/openresty/nginx/conf/nginx.conf
user nginx; #Linux的用户
worker_processes auto;
worker_rlimit_nofile 100000;
#error_log logs/error.log;
#error_log logs/error.log notice;
#error_log logs/error.log info;
#pid logs/nginx.pid;
events {
worker_connections 102400;
multi_accept on;
use epoll;
}
http {
include mime.types;
default_type application/octet-stream;
log_format main '$remote_addr - $remote_user [$time_local] "$request" '
'$status $body_bytes_sent "$http_referer" '
'"$http_user_agent" "$http_x_forwarded_for"';
access_log /var/log/nginx/access.log main;
resolver 8.8.8.8;
#resolver 127.0.0.1 valid=3600s;
sendfile on;
keepalive_timeout 65;
underscores_in_headers on;
gzip on;
include /opt/openresty/nginx/conf/conf.d/common.conf; #common.conf这个文件名字可自定义
}
编辑/opt/openresty/nginx/conf/conf.d/common.conf
##api
lua_package_path "/opt/openresty/lualib/resty/kafka/?.lua;;";
lua_package_cpath "/opt/openresty/lualib/?.so;;";
lua_shared_dict ngx_cache 128m; # cache
lua_shared_dict cache_lock 100k; # lock for cache
server {
listen 8887; #监听端口
server_name 192.168.3.215; #埋点日志的ip地址或域名,多个域名之间用空格分开
root html; #root指令用于指定虚拟主机的网页根目录,这个目录可以是相对路径,也可以是绝对路径。
lua_need_request_body on; #打开获取消息体的开关,以便能获取到消息体
access_log /var/log/nginx/message.access.log main;
error_log /var/log/nginx/message.error.log notice;
location = /lzp/message {
lua_code_cache on;
charset utf-8;
default_type 'application/json';
content_by_lua_file "/opt/openresty/nginx/lua/testMessage_kafka.lua";#引用的lua脚本
}
}
编辑/opt/openresty/nginx/lua/testMessage_kafka.lua
#创建目录mkdir /opt/openresty/nginx/lua/
vim /opt/openresty/nginx/lua/testMessage_kafka.lua<br />#编辑内存如下:
-- require需要resty.kafka.producer的lua脚本,没有会报错
local producer = require("resty.kafka.producer")
-- kafka的集群信息,单机也是可以的
local broker_list = {
{host = "192.168.3.215", port = 9092},
}
-- 定义最终kafka接受到的数据是怎样的json格式
local log_json = {}
--增加read_body之后即可获取到消息体,默认情况下可能会是nil
log_json["body"] = ngx.req.read_body()
log_json["body_data"] = ngx.req.get_body_data()
-- 定义kafka同步生产者,也可设置为异步 async
-- -- 注意!!!当设置为异步时,在测试环境需要修改batch_num,默认是200条,若大不到200条kafka端接受不到消息
-- -- encode()将log_json日志转换为字符串
-- -- 发送日志消息,send配套之第一个参数topic:
-- -- 发送日志消息,send配套之第二个参数key,用于kafka路由控制:
-- -- key为nill(空)时,一段时间向同一partition写入数据
-- -- 指定key,按照key的hash写入到对应的partition
-- -- batch_num修改为1方便测试
local bp = producer:new(broker_list, { producer_type = "async",batch_num = 1 })
-- local bp = producer:new(broker_list)
local cjson = require("cjson.safe")
local sendMsg = cjson.encode(log_json)
local ok, err = bp:send("testMessage",nil, sendMsg)
if not ok then
ngx.log(ngx.ERR, 'kafka send err:', err)
elseif ok then
ngx.say("the message send successful")
else
ngx.say("未知错误")
end
5. 开始服务操作:
useradd nginx #创建用户
passwd nginx #设置密码
#设置openresty的所有者nginx
chown -R nginx:nginx /opt/openresty/
#启动服务
cd /opt/openresty/nginx/sbin
./nginx -c /opt/openresty/nginx/conf/nginx.conf
查看服务:
ps -aux | grep nginx
nginx 2351 0.0 0.1 231052 46444 ? S Mar30 0:33 nginx: worker process
nginx 2352 0.0 0.1 233396 48540 ? S Mar30 0:35 nginx: worker process
nginx 2353 0.0 0.1 233396 48536 ? S Mar30 0:33 nginx: worker process
nginx 2354 0.0 0.1 232224 47464 ? S Mar30 0:34 nginx: worker process
nginx 2355 0.0 0.1 231052 46404 ? S Mar30 0:33 nginx: worker process
nginx 2356 0.0 0.1 232224 47460 ? S Mar30 0:34 nginx: worker process
nginx 2357 0.0 0.1 231052 46404 ? S Mar30 0:34 nginx: worker process
nginx 2358 0.0 0.1 232224 47484 ? S Mar30 0:34 nginx: worker process
root 7009 0.0 0.0 185492 2516 ? Ss Mar24 0:00 nginx: master process ./nginx -c /opt/openresty/nginx/conf/nginx.conf
查看端口:
netstat -anput | grep 8887
tcp 0 0 0.0.0.0:8887 0.0.0.0:* LISTEN 2351/nginx: worke
看到上述过程,就可以证明服务正常运行
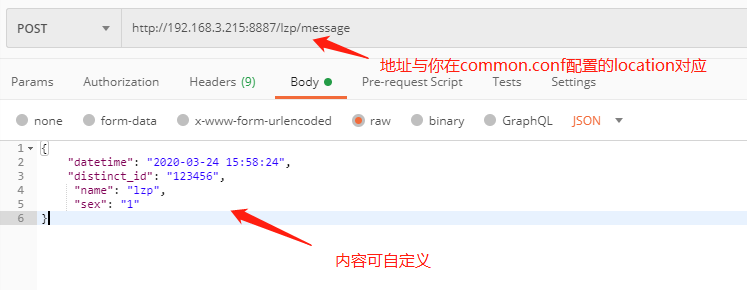
6. 使用邮递员发送发帖请求以进行简单测试,以查看Kafka是否可以接受数据
7.kafka消费数据:
kafka-console-consumer --bootstrap-server 192.168.3.215:9092 --topic testMessage --from-beginning
<p>如果消耗了数据,则说明配置成功. 如果未调整,则可以检查与/var/log/nginx/message.access.log和/var/log/nginx/message.error.log相关的错误日志以进行调整 查看全部
在许多数据采集方案中,Flume是高性能的日志采集工具. 我相信每个人都知道. 许多人认为Flume是一个组件,可以将它们中的大多数与Flume和Kafka的组合相关联以进行日志采集. 该解决方案具有许多优势,例如高性能,高吞吐量和数据可靠性. 但是,如果我们需要实时采集日志,显然这不是一个好的解决方案. 原因如下:
目前,Flume可以支持对目录中数据文件的实时监视. 某个目录的文件采集完成后,将使用完成的符号进行标记. 如果以后有数据输入此文件,则不会检测到Flume.
因此,我们通常使用这种方案进行计时采集. 只要生成新的数据目录,我们就会将数据文件采集到该目录中.
然后,本文将向您介绍基于Openresty + Lua + Kafka的实时日志采集.
要求
很多时候,我们需要实时采集用户的掩埋点数据,然后使用这些数据对用户的行为进行一些实时分析. 因此,第一步当然是解决如何实时采集数据.
我们在这里使用的解决方案是Openresty + Lua + Kafka.
原理介绍
那么什么是Openresty?这是官方报价:
OpenResty是基于Nginx和Lua的高性能Web平台. 它集成了许多复杂的Lua库,第三方模块及其大多数依赖项. 它用于方便地构建可处理超高并发性和高可伸缩性的动态Web应用程序,Web服务和动态网关.
OpenResty通过融合各种精心设计的Nginx模块,有效地将Nginx变成了功能强大的通用Web应用程序平台. 这样,Web开发人员和系统工程师可以使用Lu脚本语言来调动Nginx支持的各种C和Lua模块,并快速构建一个具有10K甚至1000个以上的单机并发连接的高性能Web应用程序系统.
OpenResty的目标是使您的Web服务直接在Nginx服务内部运行,充分利用Nginx的非阻塞I / O模型,不仅用于HTTP客户端请求,甚至用于远程后端(例如MySQL,PostgreSQL) ,Memcached和Redis等具有一致的高性能响应.
简单来说,就是通过Nginx发送客户端的请求(本文指的是用户的行为日志),以将用户的数据传递到我们指定的位置(卡夫卡),为了达到这一要求,我们使用Lua脚本,因为Openresty封装了各种Lua模块,其中之一是子安装Kafka模块,所以我们只需要编写一个简单的脚本即可通过Nginx将用户数据转发到Kafka,以便随后使用数据.
以下是供大家理解的体系结构图:
以下是使用Openresty + Lua + Kafka的优点的简要摘要:
1. 支持多种业务数据,不同的业务数据,只需要配置不同的Lua脚本,就可以将不同的业务数据发送到Kafka中的不同主题.
2. 实时采集用户触发的埋藏点数据
3. 高度可靠的集群. 由于Openresty基于Nginx,因此其群集具有非常高的性能和稳定性.
4. 高并发. 与tomcat,apache和其他Web服务器相比,Nginx的并发性比其他两个要高得多. 在正常情况下处理数万个并发并不难.
接下来让我们做一些实际的工作.
安装Openresty
此示例使用独立部署表单. 成功完成独立部署后,将在独立计算机上构建集群,只是在不同的计算机上执行相同的步骤.
注意: 本实验基于centos7.0操作系统
1. 下载Openresty依赖项:
yum install readline-devel pcre-devel openssl-devel gcc
2. 编译并安装Openresty:
#1.安装openresty:
mkdir /opt/software
mkdir /opt/module
cd /opt/software/ # 安装文件所在目录
wget https://openresty.org/download ... ar.gz
tar -xzf openresty-1.9.7.4.tar.gz -C /opt/module/
cd /opt/module/openresty-1.9.7.4
#2.配置:
# 指定目录为/opt/openresty,默认在/usr/local。
./configure --prefix=/opt/openresty \
--with-luajit \
--without-http_redis2_module \
--with-http_iconv_module
make
make install
3. 安装lua-resty-kafka
因为我们需要通过nginx + lua脚本将数据转发到Kafka,所以在编写lua脚本时需要在lua模块中使用一些Kafka依赖项.
#下载lua-resty-kafka:
cd /opt/software/
wget https://github.com/doujiang24/ ... r.zip
unzip master.zip -d /opt/module/
#拷贝kafka相关依赖脚本到openresty
cp -rf /opt/module/lua-resty-kafka-master/lib/resty/kafka/ /opt/openresty/lualib/resty/
注意: 由于每个人都熟悉Kafka,因此这里不会介绍其安装.
安装Openresty之后,目录结构如下:
drwxr-xr-x 2 root root 4096 Mar 24 14:26 bin
drwxr-xr-x 6 root root 4096 Mar 24 14:26 luajit
drwxr-xr-x 7 root root 4096 Mar 24 14:29 lualib
drwxr-xr-x 12 root root 4096 Mar 24 14:40 nginx
4. 配置文件
编辑/opt/openresty/nginx/conf/nginx.conf
user nginx; #Linux的用户
worker_processes auto;
worker_rlimit_nofile 100000;
#error_log logs/error.log;
#error_log logs/error.log notice;
#error_log logs/error.log info;
#pid logs/nginx.pid;
events {
worker_connections 102400;
multi_accept on;
use epoll;
}
http {
include mime.types;
default_type application/octet-stream;
log_format main '$remote_addr - $remote_user [$time_local] "$request" '
'$status $body_bytes_sent "$http_referer" '
'"$http_user_agent" "$http_x_forwarded_for"';
access_log /var/log/nginx/access.log main;
resolver 8.8.8.8;
#resolver 127.0.0.1 valid=3600s;
sendfile on;
keepalive_timeout 65;
underscores_in_headers on;
gzip on;
include /opt/openresty/nginx/conf/conf.d/common.conf; #common.conf这个文件名字可自定义
}
编辑/opt/openresty/nginx/conf/conf.d/common.conf
##api
lua_package_path "/opt/openresty/lualib/resty/kafka/?.lua;;";
lua_package_cpath "/opt/openresty/lualib/?.so;;";
lua_shared_dict ngx_cache 128m; # cache
lua_shared_dict cache_lock 100k; # lock for cache
server {
listen 8887; #监听端口
server_name 192.168.3.215; #埋点日志的ip地址或域名,多个域名之间用空格分开
root html; #root指令用于指定虚拟主机的网页根目录,这个目录可以是相对路径,也可以是绝对路径。
lua_need_request_body on; #打开获取消息体的开关,以便能获取到消息体
access_log /var/log/nginx/message.access.log main;
error_log /var/log/nginx/message.error.log notice;
location = /lzp/message {
lua_code_cache on;
charset utf-8;
default_type 'application/json';
content_by_lua_file "/opt/openresty/nginx/lua/testMessage_kafka.lua";#引用的lua脚本
}
}
编辑/opt/openresty/nginx/lua/testMessage_kafka.lua
#创建目录mkdir /opt/openresty/nginx/lua/
vim /opt/openresty/nginx/lua/testMessage_kafka.lua<br />#编辑内存如下:
-- require需要resty.kafka.producer的lua脚本,没有会报错
local producer = require("resty.kafka.producer")
-- kafka的集群信息,单机也是可以的
local broker_list = {
{host = "192.168.3.215", port = 9092},
}
-- 定义最终kafka接受到的数据是怎样的json格式
local log_json = {}
--增加read_body之后即可获取到消息体,默认情况下可能会是nil
log_json["body"] = ngx.req.read_body()
log_json["body_data"] = ngx.req.get_body_data()
-- 定义kafka同步生产者,也可设置为异步 async
-- -- 注意!!!当设置为异步时,在测试环境需要修改batch_num,默认是200条,若大不到200条kafka端接受不到消息
-- -- encode()将log_json日志转换为字符串
-- -- 发送日志消息,send配套之第一个参数topic:
-- -- 发送日志消息,send配套之第二个参数key,用于kafka路由控制:
-- -- key为nill(空)时,一段时间向同一partition写入数据
-- -- 指定key,按照key的hash写入到对应的partition
-- -- batch_num修改为1方便测试
local bp = producer:new(broker_list, { producer_type = "async",batch_num = 1 })
-- local bp = producer:new(broker_list)
local cjson = require("cjson.safe")
local sendMsg = cjson.encode(log_json)
local ok, err = bp:send("testMessage",nil, sendMsg)
if not ok then
ngx.log(ngx.ERR, 'kafka send err:', err)
elseif ok then
ngx.say("the message send successful")
else
ngx.say("未知错误")
end
5. 开始服务操作:
useradd nginx #创建用户
passwd nginx #设置密码
#设置openresty的所有者nginx
chown -R nginx:nginx /opt/openresty/
#启动服务
cd /opt/openresty/nginx/sbin
./nginx -c /opt/openresty/nginx/conf/nginx.conf
查看服务:
ps -aux | grep nginx
nginx 2351 0.0 0.1 231052 46444 ? S Mar30 0:33 nginx: worker process
nginx 2352 0.0 0.1 233396 48540 ? S Mar30 0:35 nginx: worker process
nginx 2353 0.0 0.1 233396 48536 ? S Mar30 0:33 nginx: worker process
nginx 2354 0.0 0.1 232224 47464 ? S Mar30 0:34 nginx: worker process
nginx 2355 0.0 0.1 231052 46404 ? S Mar30 0:33 nginx: worker process
nginx 2356 0.0 0.1 232224 47460 ? S Mar30 0:34 nginx: worker process
nginx 2357 0.0 0.1 231052 46404 ? S Mar30 0:34 nginx: worker process
nginx 2358 0.0 0.1 232224 47484 ? S Mar30 0:34 nginx: worker process
root 7009 0.0 0.0 185492 2516 ? Ss Mar24 0:00 nginx: master process ./nginx -c /opt/openresty/nginx/conf/nginx.conf
查看端口:
netstat -anput | grep 8887
tcp 0 0 0.0.0.0:8887 0.0.0.0:* LISTEN 2351/nginx: worke
看到上述过程,就可以证明服务正常运行
6. 使用邮递员发送发帖请求以进行简单测试,以查看Kafka是否可以接受数据
7.kafka消费数据:
kafka-console-consumer --bootstrap-server 192.168.3.215:9092 --topic testMessage --from-beginning
<p>如果消耗了数据,则说明配置成功. 如果未调整,则可以检查与/var/log/nginx/message.access.log和/var/log/nginx/message.error.log相关的错误日志以进行调整 查看全部
简介
在许多数据采集方案中,Flume是高性能的日志采集工具. 我相信每个人都知道. 许多人认为Flume是一个组件,可以将它们中的大多数与Flume和Kafka的组合相关联以进行日志采集. 该解决方案具有许多优势,例如高性能,高吞吐量和数据可靠性. 但是,如果我们需要实时采集日志,显然这不是一个好的解决方案. 原因如下:
目前,Flume可以支持对目录中数据文件的实时监视. 某个目录的文件采集完成后,将使用完成的符号进行标记. 如果以后有数据输入此文件,则不会检测到Flume.
因此,我们通常使用这种方案进行计时采集. 只要生成新的数据目录,我们就会将数据文件采集到该目录中.
然后,本文将向您介绍基于Openresty + Lua + Kafka的实时日志采集.
要求
很多时候,我们需要实时采集用户的掩埋点数据,然后使用这些数据对用户的行为进行一些实时分析. 因此,第一步当然是解决如何实时采集数据.
我们在这里使用的解决方案是Openresty + Lua + Kafka.
原理介绍
那么什么是Openresty?这是官方报价:
OpenResty是基于Nginx和Lua的高性能Web平台. 它集成了许多复杂的Lua库,第三方模块及其大多数依赖项. 它用于方便地构建可处理超高并发性和高可伸缩性的动态Web应用程序,Web服务和动态网关.
OpenResty通过融合各种精心设计的Nginx模块,有效地将Nginx变成了功能强大的通用Web应用程序平台. 这样,Web开发人员和系统工程师可以使用Lu脚本语言来调动Nginx支持的各种C和Lua模块,并快速构建一个具有10K甚至1000个以上的单机并发连接的高性能Web应用程序系统.
OpenResty的目标是使您的Web服务直接在Nginx服务内部运行,充分利用Nginx的非阻塞I / O模型,不仅用于HTTP客户端请求,甚至用于远程后端(例如MySQL,PostgreSQL) ,Memcached和Redis等具有一致的高性能响应.
简单来说,就是通过Nginx发送客户端的请求(本文指的是用户的行为日志),以将用户的数据传递到我们指定的位置(卡夫卡),为了达到这一要求,我们使用Lua脚本,因为Openresty封装了各种Lua模块,其中之一是子安装Kafka模块,所以我们只需要编写一个简单的脚本即可通过Nginx将用户数据转发到Kafka,以便随后使用数据.
以下是供大家理解的体系结构图:
以下是使用Openresty + Lua + Kafka的优点的简要摘要:
1. 支持多种业务数据,不同的业务数据,只需要配置不同的Lua脚本,就可以将不同的业务数据发送到Kafka中的不同主题.
2. 实时采集用户触发的埋藏点数据
3. 高度可靠的集群. 由于Openresty基于Nginx,因此其群集具有非常高的性能和稳定性.
4. 高并发. 与tomcat,apache和其他Web服务器相比,Nginx的并发性比其他两个要高得多. 在正常情况下处理数万个并发并不难.
接下来让我们做一些实际的工作.
安装Openresty
此示例使用独立部署表单. 成功完成独立部署后,将在独立计算机上构建集群,只是在不同的计算机上执行相同的步骤.
注意: 本实验基于centos7.0操作系统
1. 下载Openresty依赖项:
yum install readline-devel pcre-devel openssl-devel gcc
2. 编译并安装Openresty:
#1.安装openresty:
mkdir /opt/software
mkdir /opt/module
cd /opt/software/ # 安装文件所在目录
wget https://openresty.org/download ... ar.gz
tar -xzf openresty-1.9.7.4.tar.gz -C /opt/module/
cd /opt/module/openresty-1.9.7.4
#2.配置:
# 指定目录为/opt/openresty,默认在/usr/local。
./configure --prefix=/opt/openresty \
--with-luajit \
--without-http_redis2_module \
--with-http_iconv_module
make
make install
3. 安装lua-resty-kafka
因为我们需要通过nginx + lua脚本将数据转发到Kafka,所以在编写lua脚本时需要在lua模块中使用一些Kafka依赖项.
#下载lua-resty-kafka:
cd /opt/software/
wget https://github.com/doujiang24/ ... r.zip
unzip master.zip -d /opt/module/
#拷贝kafka相关依赖脚本到openresty
cp -rf /opt/module/lua-resty-kafka-master/lib/resty/kafka/ /opt/openresty/lualib/resty/
注意: 由于每个人都熟悉Kafka,因此这里不会介绍其安装.
安装Openresty之后,目录结构如下:
drwxr-xr-x 2 root root 4096 Mar 24 14:26 bin
drwxr-xr-x 6 root root 4096 Mar 24 14:26 luajit
drwxr-xr-x 7 root root 4096 Mar 24 14:29 lualib
drwxr-xr-x 12 root root 4096 Mar 24 14:40 nginx
4. 配置文件
编辑/opt/openresty/nginx/conf/nginx.conf
user nginx; #Linux的用户
worker_processes auto;
worker_rlimit_nofile 100000;
#error_log logs/error.log;
#error_log logs/error.log notice;
#error_log logs/error.log info;
#pid logs/nginx.pid;
events {
worker_connections 102400;
multi_accept on;
use epoll;
}
http {
include mime.types;
default_type application/octet-stream;
log_format main '$remote_addr - $remote_user [$time_local] "$request" '
'$status $body_bytes_sent "$http_referer" '
'"$http_user_agent" "$http_x_forwarded_for"';
access_log /var/log/nginx/access.log main;
resolver 8.8.8.8;
#resolver 127.0.0.1 valid=3600s;
sendfile on;
keepalive_timeout 65;
underscores_in_headers on;
gzip on;
include /opt/openresty/nginx/conf/conf.d/common.conf; #common.conf这个文件名字可自定义
}
编辑/opt/openresty/nginx/conf/conf.d/common.conf
##api
lua_package_path "/opt/openresty/lualib/resty/kafka/?.lua;;";
lua_package_cpath "/opt/openresty/lualib/?.so;;";
lua_shared_dict ngx_cache 128m; # cache
lua_shared_dict cache_lock 100k; # lock for cache
server {
listen 8887; #监听端口
server_name 192.168.3.215; #埋点日志的ip地址或域名,多个域名之间用空格分开
root html; #root指令用于指定虚拟主机的网页根目录,这个目录可以是相对路径,也可以是绝对路径。
lua_need_request_body on; #打开获取消息体的开关,以便能获取到消息体
access_log /var/log/nginx/message.access.log main;
error_log /var/log/nginx/message.error.log notice;
location = /lzp/message {
lua_code_cache on;
charset utf-8;
default_type 'application/json';
content_by_lua_file "/opt/openresty/nginx/lua/testMessage_kafka.lua";#引用的lua脚本
}
}
编辑/opt/openresty/nginx/lua/testMessage_kafka.lua
#创建目录mkdir /opt/openresty/nginx/lua/
vim /opt/openresty/nginx/lua/testMessage_kafka.lua<br />#编辑内存如下:
-- require需要resty.kafka.producer的lua脚本,没有会报错
local producer = require("resty.kafka.producer")
-- kafka的集群信息,单机也是可以的
local broker_list = {
{host = "192.168.3.215", port = 9092},
}
-- 定义最终kafka接受到的数据是怎样的json格式
local log_json = {}
--增加read_body之后即可获取到消息体,默认情况下可能会是nil
log_json["body"] = ngx.req.read_body()
log_json["body_data"] = ngx.req.get_body_data()
-- 定义kafka同步生产者,也可设置为异步 async
-- -- 注意!!!当设置为异步时,在测试环境需要修改batch_num,默认是200条,若大不到200条kafka端接受不到消息
-- -- encode()将log_json日志转换为字符串
-- -- 发送日志消息,send配套之第一个参数topic:
-- -- 发送日志消息,send配套之第二个参数key,用于kafka路由控制:
-- -- key为nill(空)时,一段时间向同一partition写入数据
-- -- 指定key,按照key的hash写入到对应的partition
-- -- batch_num修改为1方便测试
local bp = producer:new(broker_list, { producer_type = "async",batch_num = 1 })
-- local bp = producer:new(broker_list)
local cjson = require("cjson.safe")
local sendMsg = cjson.encode(log_json)
local ok, err = bp:send("testMessage",nil, sendMsg)
if not ok then
ngx.log(ngx.ERR, 'kafka send err:', err)
elseif ok then
ngx.say("the message send successful")
else
ngx.say("未知错误")
end
5. 开始服务操作:
useradd nginx #创建用户
passwd nginx #设置密码
#设置openresty的所有者nginx
chown -R nginx:nginx /opt/openresty/
#启动服务
cd /opt/openresty/nginx/sbin
./nginx -c /opt/openresty/nginx/conf/nginx.conf
查看服务:
ps -aux | grep nginx
nginx 2351 0.0 0.1 231052 46444 ? S Mar30 0:33 nginx: worker process
nginx 2352 0.0 0.1 233396 48540 ? S Mar30 0:35 nginx: worker process
nginx 2353 0.0 0.1 233396 48536 ? S Mar30 0:33 nginx: worker process
nginx 2354 0.0 0.1 232224 47464 ? S Mar30 0:34 nginx: worker process
nginx 2355 0.0 0.1 231052 46404 ? S Mar30 0:33 nginx: worker process
nginx 2356 0.0 0.1 232224 47460 ? S Mar30 0:34 nginx: worker process
nginx 2357 0.0 0.1 231052 46404 ? S Mar30 0:34 nginx: worker process
nginx 2358 0.0 0.1 232224 47484 ? S Mar30 0:34 nginx: worker process
root 7009 0.0 0.0 185492 2516 ? Ss Mar24 0:00 nginx: master process ./nginx -c /opt/openresty/nginx/conf/nginx.conf
查看端口:
netstat -anput | grep 8887
tcp 0 0 0.0.0.0:8887 0.0.0.0:* LISTEN 2351/nginx: worke
看到上述过程,就可以证明服务正常运行
6. 使用邮递员发送发帖请求以进行简单测试,以查看Kafka是否可以接受数据
7.kafka消费数据:
kafka-console-consumer --bootstrap-server 192.168.3.215:9092 --topic testMessage --from-beginning
<p>如果消耗了数据,则说明配置成功. 如果未调整,则可以检查与/var/log/nginx/message.access.log和/var/log/nginx/message.error.log相关的错误日志以进行调整
Flume和Kafka完成实时数据采集
采集交流 • 优采云 发表了文章 • 0 个评论 • 435 次浏览 • 2020-08-06 16:17
Flume和Kafka完成实时数据采集
写在前面
在生产环境中,通常将水槽和Kafka结合使用. 可以同时使用它们两者来采集实时日志信息非常重要. 如果您不懂水槽和卡夫卡,可以先检查一下我写的关于这两部分的知识. 让我们再次学习,这部分操作也是可能的.
实时数据的采集面临一个问题. 我们如何生成实时数据源?因为我们可能想直接获取实时数据流不是那么方便. 我之前写了一篇有关实时数据流的python生成器的文章,文章地址:
您可以先看看如何生成实时数据...
在想什么? ?如何开始? ?
分析: 我们可以从数据流开始. 数据首先位于Web服务器中. 我们的访问日志由Nginx服务器实时采集到指定文件中. 我们从该文件采集日志数据,即: webserver => flume => kafka
Web服务器日志存储文件位置
此文件的位置通常由我们自己设置
我们的网络日志的存储目录为:
/home/hadoop/data/project/logs/access.log下面
[hadoop@hadoop000 logs]$ pwd
/home/hadoop/data/project/logs
[hadoop@hadoop000 logs]$ ls
access.log
[hadoop@hadoop000 logs]$
水槽
做水槽实际上是写一个conf文件,所以面临选择的问题
来源选择?频道选择?选择接收器?
在这里,我们选择exec源存储通道kafka sink
怎么写?
按照前面提到的步骤1234
在官方网站上,我们可以找到应如何选择:
1)配置源
exec来源
# Describe/configure the source
a1.sources.r1.type = exec
a1.sources.r1.command = tail -F /home/hadoop/data/project/logs/access.log
a1.sources.r1.shell = /bin/sh -c
2)配置频道
内存频道
a1.channels.c1.type = memory
3)配置接收器
卡夫卡水槽
对于flume1.6版本,请参阅#kafka-sink
a1.sinks.k1.type = org.apache.flume.sink.kafka.KafkaSink
a1.sinks.k1.brokerList = hadoop000:9092
a1.sinks.k1.topic = flume_kafka
a1.sinks.k1.batchSize = 5
a1.sinks.k1.requiredAcks =1
将以上三个组成部分组合在一起
a1.sources.r1.channels = c1
a1.sinks.k1.channel = c1
我们的新文件称为test3.conf
粘贴我们自己分析的代码:
[hadoop@hadoop000 conf]$ vim test3.conf
a1.sources.r1.type = exec
a1.sources.r1.command = tail -F /home/hadoop/data/project/logs/access.log
a1.sources.r1.shell = /bin/sh -c
a1.channels.c1.type = memory
a1.sinks.k1.type = org.apache.flume.sink.kafka.KafkaSink
a1.sinks.k1.brokerList = hadoop000:9092
a1.sinks.k1.topic = flume_kafka
a1.sinks.k1.batchSize = 5
a1.sinks.k1.requiredAcks =1
a1.sources.r1.channels = c1
a1.sinks.k1.channel = c1
我们不会从这里开始,因为它涉及kafka的事情,我们必须首先部署kafka,
Kafka部署
如何部署Kafka? ?
请访问官方网站,我们首先启动Zookeeper流程,然后才能启动kafka服务器
第1步: 启动动物园管理员
[hadoop@hadoop000 ~]$
[hadoop@hadoop000 ~]$ jps
29147 Jps
[hadoop@hadoop000 ~]$ zkServer.sh start
JMX enabled by default
Using config: /home/hadoop/app/zk/bin/../conf/zoo.cfg
Starting zookeeper ... STARTED
[hadoop@hadoop000 ~]$ jps
29172 QuorumPeerMain
29189 Jps
[hadoop@hadoop000 ~]$
第2步: 启动服务器
[hadoop@hadoop000 ~]$ kafka-server-start.sh $KAFKA_HOME/config/server.properties
#外开一个窗口,查看jps
[hadoop@hadoop000 ~]$ jps
29330 Jps
29172 QuorumPeerMain
29229 Kafka
[hadoop@hadoop000 ~]$
如果这部分不是很熟悉,您可以参考
第3步: 创建主题
[hadoop@hadoop000 ~]$ kafka-topics.sh --create --zookeeper localhost:2181 --replication-factor 1 --partitions 1 --topic flume_kafka
WARNING: Due to limitations in metric names, topics with a period ('.') or underscore ('_') could collide. To avoid issues it is best to use either, but not both.
Created topic "flume_kafka".
[hadoop@hadoop000 ~]$
第4步: 启动上一个代理
[hadoop@hadoop000 conf]$ flume-ng agent --name a1 --conf . --conf-file ./test3.conf -Dflume.root.logger=INFO,console
第5步: 启动消费者
kafka-console-consumer.sh --zookeeper hadoop000:2181 –topic flume-kafka
执行上述第五步后,您将收到刷新屏幕的结果,哈哈哈! !
上面的消费者将不断刷新屏幕,这仍然非常有趣!!!
这里的使用者将接收到的数据放在屏幕上
稍后,我们将介绍使用SparkStreaming作为使用者来实时接收数据,并对接收到的数据进行简单的数据清理,并从随机生成的日志中过滤出所需的数据... 查看全部
写在前面
在生产环境中,通常将水槽和Kafka结合使用. 可以同时使用它们两者来采集实时日志信息非常重要. 如果您不懂水槽和卡夫卡,可以先检查一下我写的关于这两部分的知识. 让我们再次学习,这部分操作也是可能的.
实时数据的采集面临一个问题. 我们如何生成实时数据源?因为我们可能想直接获取实时数据流不是那么方便. 我之前写了一篇有关实时数据流的python生成器的文章,文章地址:
您可以先看看如何生成实时数据...
在想什么? ?如何开始? ?
分析: 我们可以从数据流开始. 数据首先位于Web服务器中. 我们的访问日志由Nginx服务器实时采集到指定文件中. 我们从该文件采集日志数据,即: webserver => flume => kafka
Web服务器日志存储文件位置
此文件的位置通常由我们自己设置
我们的网络日志的存储目录为:
/home/hadoop/data/project/logs/access.log下面
[hadoop@hadoop000 logs]$ pwd
/home/hadoop/data/project/logs
[hadoop@hadoop000 logs]$ ls
access.log
[hadoop@hadoop000 logs]$
水槽
做水槽实际上是写一个conf文件,所以面临选择的问题
来源选择?频道选择?选择接收器?
在这里,我们选择exec源存储通道kafka sink
怎么写?
按照前面提到的步骤1234
在官方网站上,我们可以找到应如何选择:
1)配置源
exec来源
# Describe/configure the source
a1.sources.r1.type = exec
a1.sources.r1.command = tail -F /home/hadoop/data/project/logs/access.log
a1.sources.r1.shell = /bin/sh -c
2)配置频道
内存频道
a1.channels.c1.type = memory
3)配置接收器
卡夫卡水槽
对于flume1.6版本,请参阅#kafka-sink
a1.sinks.k1.type = org.apache.flume.sink.kafka.KafkaSink
a1.sinks.k1.brokerList = hadoop000:9092
a1.sinks.k1.topic = flume_kafka
a1.sinks.k1.batchSize = 5
a1.sinks.k1.requiredAcks =1
将以上三个组成部分组合在一起
a1.sources.r1.channels = c1
a1.sinks.k1.channel = c1
我们的新文件称为test3.conf
粘贴我们自己分析的代码:
[hadoop@hadoop000 conf]$ vim test3.conf
a1.sources.r1.type = exec
a1.sources.r1.command = tail -F /home/hadoop/data/project/logs/access.log
a1.sources.r1.shell = /bin/sh -c
a1.channels.c1.type = memory
a1.sinks.k1.type = org.apache.flume.sink.kafka.KafkaSink
a1.sinks.k1.brokerList = hadoop000:9092
a1.sinks.k1.topic = flume_kafka
a1.sinks.k1.batchSize = 5
a1.sinks.k1.requiredAcks =1
a1.sources.r1.channels = c1
a1.sinks.k1.channel = c1
我们不会从这里开始,因为它涉及kafka的事情,我们必须首先部署kafka,
Kafka部署
如何部署Kafka? ?
请访问官方网站,我们首先启动Zookeeper流程,然后才能启动kafka服务器
第1步: 启动动物园管理员
[hadoop@hadoop000 ~]$
[hadoop@hadoop000 ~]$ jps
29147 Jps
[hadoop@hadoop000 ~]$ zkServer.sh start
JMX enabled by default
Using config: /home/hadoop/app/zk/bin/../conf/zoo.cfg
Starting zookeeper ... STARTED
[hadoop@hadoop000 ~]$ jps
29172 QuorumPeerMain
29189 Jps
[hadoop@hadoop000 ~]$
第2步: 启动服务器
[hadoop@hadoop000 ~]$ kafka-server-start.sh $KAFKA_HOME/config/server.properties
#外开一个窗口,查看jps
[hadoop@hadoop000 ~]$ jps
29330 Jps
29172 QuorumPeerMain
29229 Kafka
[hadoop@hadoop000 ~]$
如果这部分不是很熟悉,您可以参考
第3步: 创建主题
[hadoop@hadoop000 ~]$ kafka-topics.sh --create --zookeeper localhost:2181 --replication-factor 1 --partitions 1 --topic flume_kafka
WARNING: Due to limitations in metric names, topics with a period ('.') or underscore ('_') could collide. To avoid issues it is best to use either, but not both.
Created topic "flume_kafka".
[hadoop@hadoop000 ~]$
第4步: 启动上一个代理
[hadoop@hadoop000 conf]$ flume-ng agent --name a1 --conf . --conf-file ./test3.conf -Dflume.root.logger=INFO,console
第5步: 启动消费者
kafka-console-consumer.sh --zookeeper hadoop000:2181 –topic flume-kafka
执行上述第五步后,您将收到刷新屏幕的结果,哈哈哈! !
上面的消费者将不断刷新屏幕,这仍然非常有趣!!!
这里的使用者将接收到的数据放在屏幕上
稍后,我们将介绍使用SparkStreaming作为使用者来实时接收数据,并对接收到的数据进行简单的数据清理,并从随机生成的日志中过滤出所需的数据... 查看全部
Flume和Kafka完成实时数据采集
写在前面
在生产环境中,通常将水槽和Kafka结合使用. 可以同时使用它们两者来采集实时日志信息非常重要. 如果您不懂水槽和卡夫卡,可以先检查一下我写的关于这两部分的知识. 让我们再次学习,这部分操作也是可能的.
实时数据的采集面临一个问题. 我们如何生成实时数据源?因为我们可能想直接获取实时数据流不是那么方便. 我之前写了一篇有关实时数据流的python生成器的文章,文章地址:
您可以先看看如何生成实时数据...
在想什么? ?如何开始? ?
分析: 我们可以从数据流开始. 数据首先位于Web服务器中. 我们的访问日志由Nginx服务器实时采集到指定文件中. 我们从该文件采集日志数据,即: webserver => flume => kafka
Web服务器日志存储文件位置
此文件的位置通常由我们自己设置
我们的网络日志的存储目录为:
/home/hadoop/data/project/logs/access.log下面
[hadoop@hadoop000 logs]$ pwd
/home/hadoop/data/project/logs
[hadoop@hadoop000 logs]$ ls
access.log
[hadoop@hadoop000 logs]$
水槽
做水槽实际上是写一个conf文件,所以面临选择的问题
来源选择?频道选择?选择接收器?
在这里,我们选择exec源存储通道kafka sink
怎么写?
按照前面提到的步骤1234
在官方网站上,我们可以找到应如何选择:
1)配置源
exec来源
# Describe/configure the source
a1.sources.r1.type = exec
a1.sources.r1.command = tail -F /home/hadoop/data/project/logs/access.log
a1.sources.r1.shell = /bin/sh -c
2)配置频道
内存频道
a1.channels.c1.type = memory
3)配置接收器
卡夫卡水槽
对于flume1.6版本,请参阅#kafka-sink
a1.sinks.k1.type = org.apache.flume.sink.kafka.KafkaSink
a1.sinks.k1.brokerList = hadoop000:9092
a1.sinks.k1.topic = flume_kafka
a1.sinks.k1.batchSize = 5
a1.sinks.k1.requiredAcks =1
将以上三个组成部分组合在一起
a1.sources.r1.channels = c1
a1.sinks.k1.channel = c1
我们的新文件称为test3.conf
粘贴我们自己分析的代码:
[hadoop@hadoop000 conf]$ vim test3.conf
a1.sources.r1.type = exec
a1.sources.r1.command = tail -F /home/hadoop/data/project/logs/access.log
a1.sources.r1.shell = /bin/sh -c
a1.channels.c1.type = memory
a1.sinks.k1.type = org.apache.flume.sink.kafka.KafkaSink
a1.sinks.k1.brokerList = hadoop000:9092
a1.sinks.k1.topic = flume_kafka
a1.sinks.k1.batchSize = 5
a1.sinks.k1.requiredAcks =1
a1.sources.r1.channels = c1
a1.sinks.k1.channel = c1
我们不会从这里开始,因为它涉及kafka的事情,我们必须首先部署kafka,
Kafka部署
如何部署Kafka? ?
请访问官方网站,我们首先启动Zookeeper流程,然后才能启动kafka服务器
第1步: 启动动物园管理员
[hadoop@hadoop000 ~]$
[hadoop@hadoop000 ~]$ jps
29147 Jps
[hadoop@hadoop000 ~]$ zkServer.sh start
JMX enabled by default
Using config: /home/hadoop/app/zk/bin/../conf/zoo.cfg
Starting zookeeper ... STARTED
[hadoop@hadoop000 ~]$ jps
29172 QuorumPeerMain
29189 Jps
[hadoop@hadoop000 ~]$
第2步: 启动服务器
[hadoop@hadoop000 ~]$ kafka-server-start.sh $KAFKA_HOME/config/server.properties
#外开一个窗口,查看jps
[hadoop@hadoop000 ~]$ jps
29330 Jps
29172 QuorumPeerMain
29229 Kafka
[hadoop@hadoop000 ~]$
如果这部分不是很熟悉,您可以参考
第3步: 创建主题
[hadoop@hadoop000 ~]$ kafka-topics.sh --create --zookeeper localhost:2181 --replication-factor 1 --partitions 1 --topic flume_kafka
WARNING: Due to limitations in metric names, topics with a period ('.') or underscore ('_') could collide. To avoid issues it is best to use either, but not both.
Created topic "flume_kafka".
[hadoop@hadoop000 ~]$
第4步: 启动上一个代理
[hadoop@hadoop000 conf]$ flume-ng agent --name a1 --conf . --conf-file ./test3.conf -Dflume.root.logger=INFO,console
第5步: 启动消费者
kafka-console-consumer.sh --zookeeper hadoop000:2181 –topic flume-kafka
执行上述第五步后,您将收到刷新屏幕的结果,哈哈哈! !
上面的消费者将不断刷新屏幕,这仍然非常有趣!!!
这里的使用者将接收到的数据放在屏幕上
稍后,我们将介绍使用SparkStreaming作为使用者来实时接收数据,并对接收到的数据进行简单的数据清理,并从随机生成的日志中过滤出所需的数据...
Filebeat实时采集Nginx日志
采集交流 • 优采云 发表了文章 • 0 个评论 • 644 次浏览 • 2020-08-06 10:13
说明Filebeat版本为5.3.0
之所以使用Beats系列的Filebeat代替Logstash的原因是,Logstash消耗了太多资源(请忽略那些拥有足够服务器资源的用户)
在官方网站上,Logstash的下载量为89M,而Filebeat的下载量仅为840M,这很明显
Logstash可以配置jvm参数. 经过我自己的调试,内存分配很小,启动缓慢,有时甚至根本无法启动. 如果分配量很大,其他服务将没有资源
对于低配置服务器而言,选择Filebeat是最佳选择,并且既然Filebeat已开始取代Logstash,仍然有必要修改nginx日志格式nginx.config
更改日志记录的格式
log_format json '{ "@timestamp": "$time_iso8601", '
'"time": "$time_iso8601", '
'"remote_addr": "$remote_addr", '
'"remote_user": "$remote_user", '
'"body_bytes_sent": "$body_bytes_sent", '
'"request_time": "$request_time", '
'"status": "$status", '
'"host": "$host", '
'"request": "$request", '
'"request_method": "$request_method", '
'"uri": "$uri", '
'"http_referrer": "$http_referer", '
'"body_bytes_sent":"$body_bytes_sent", '
'"http_x_forwarded_for": "$http_x_forwarded_for", '
'"http_user_agent": "$http_user_agent" '
'}';
access_log /var/log/nginx/access.log json;
filebeat.yml
#=========================== Filebeat prospectors =============================
filebeat.prospectors:
- input_type: log
# Paths that should be crawled and fetched. Glob based paths.
paths:
- /var/log/nginx/*access*.log
json.keys_under_root: true
json.overwrite_keys: true
#-------------------------- Elasticsearch output ------------------------------
output.elasticsearch:
# Array of hosts to connect to.
hosts: ["ip:port","ip:port"]
index: "filebeat_server_nginx_%{+YYYY-MM}"
这里要注意的是
json.keys_under_root: 默认值为FALSE,这意味着我们的json日志将在解析后放置在json密钥上. 设置为TRUE,所有键都将放置在根节点中
json.overwrite_keys: 是否覆盖原创密钥,这是密钥配置. 将keys_under_root设置为TRUE之后,然后将overwrite_keys设置为TRUE以覆盖filebeat默认密钥值
还有其他配置
json.add_error_key: 添加json_error密钥以记录json解析失败错误
json.message_key: 指定解析后放置json日志的键,默认为json,还可以指定日志等.
坦率地说,区别在于配置前的elasticsearch数据如下:
{
"_index": "filebeat_server_nginx_2018-05",
"_type": "log",
"_id": "AWM9sVOkCcRcg0IPg399",
"_version": 1,
"_score": 1,
"_source": {
"@timestamp": "2018-05-08T03:00:17.544Z",
"beat": {
"hostname": "VM_252_18_centos",
"name": "VM_252_18_centos",
"version": "5.3.0"
},
"input_type": "log",
"json": {},
"message": "{ "@timestamp": "2018-05-08T11:00:11+08:00", "time": "2018-05-08T11:00:11+08:00", "remote_addr": "113.16.251.67", "remote_user": "-", "body_bytes_sent": "403", "request_time": "0.000", "status": "200", "host": "blog.joylau.cn", "request": "GET /img/%E7%BD%91%E6%98%93%E4%BA%91%E9%9F%B3%E4%B9%90.png HTTP/1.1", "request_method": "GET", "uri": "/img/\xE7\xBD\x91\xE6\x98\x93\xE4\xBA\x91\xE9\x9F\xB3\xE4\xB9\x90.png", "http_referrer": "http://blog.joylau.cn/css/style.css", "body_bytes_sent":"403", "http_x_forwarded_for": "-", "http_user_agent": "Mozilla/5.0 (Windows NT 10.0; Win64; x64) AppleWebKit/537.36 (KHTML, like Gecko) Chrome/62.0.3202.94 Safari/537.36" }",
"offset": 7633,
"source": "/var/log/nginx/access.log",
"type": "log"
}
}
配置后,它看起来像这样:
{
"_index": "filebeat_server_nginx_2018-05",
"_type": "log",
"_id": "AWM9rjLd8mVZNgvhdnN9",
"_version": 1,
"_score": 1,
"_source": {
"@timestamp": "2018-05-08T02:56:50.000Z",
"beat": {
"hostname": "VM_252_18_centos",
"name": "VM_252_18_centos",
"version": "5.3.0"
},
"body_bytes_sent": "12576",
"host": "blog.joylau.cn",
"http_referrer": "http://blog.joylau.cn/",
"http_user_agent": "Mozilla/5.0 (Windows NT 10.0; Win64; x64) AppleWebKit/537.36 (KHTML, like Gecko) Chrome/66.0.3359.139 Safari/537.36",
"http_x_forwarded_for": "-",
"input_type": "log",
"offset": 3916,
"remote_addr": "60.166.12.138",
"remote_user": "-",
"request": "GET /2018/03/01/JDK8-Stream-Distinct/ HTTP/1.1",
"request_method": "GET",
"request_time": "0.000",
"source": "/var/log/nginx/access.log",
"status": "200",
"time": "2018-05-08T10:56:50+08:00",
"type": "log",
"uri": "/2018/03/01/JDK8-Stream-Distinct/index.html"
}
}
这样看起来很舒服
启动FileBeat
进入Filebeat目录
nohup sudo ./filebeat -e -c filebeat.yml >/dev/null 2>&1 &
更新
如果nginx日志收录中文,则中文将转换为Unicode编码. 如果没有,只需添加escape = json参数.
log_format json escape=json '{ "@timestamp": "$time_iso8601", '
'"time": "$time_iso8601", '
'"remote_addr": "$remote_addr", '
'"remote_user": "$remote_user", '
'"body_bytes_sent": "$body_bytes_sent", '
'"request_time": "$request_time", '
'"status": "$status", '
'"host": "$host", '
'"request": "$request", '
'"request_method": "$request_method", '
'"uri": "$uri", '
'"http_referrer": "$http_referer", '
'"body_bytes_sent":"$body_bytes_sent", '
'"http_x_forwarded_for": "$http_x_forwarded_for", '
'"http_user_agent": "$http_user_agent" '
'}';
access_log /var/log/nginx/access.log json;
消息 查看全部
之所以使用Beats系列的Filebeat代替Logstash的原因是,Logstash消耗了太多资源(请忽略那些拥有足够服务器资源的用户)
在官方网站上,Logstash的下载量为89M,而Filebeat的下载量仅为840M,这很明显
Logstash可以配置jvm参数. 经过我自己的调试,内存分配很小,启动缓慢,有时甚至根本无法启动. 如果分配量很大,其他服务将没有资源
对于低配置服务器而言,选择Filebeat是最佳选择,并且既然Filebeat已开始取代Logstash,仍然有必要修改nginx日志格式nginx.config
更改日志记录的格式
log_format json '{ "@timestamp": "$time_iso8601", '
'"time": "$time_iso8601", '
'"remote_addr": "$remote_addr", '
'"remote_user": "$remote_user", '
'"body_bytes_sent": "$body_bytes_sent", '
'"request_time": "$request_time", '
'"status": "$status", '
'"host": "$host", '
'"request": "$request", '
'"request_method": "$request_method", '
'"uri": "$uri", '
'"http_referrer": "$http_referer", '
'"body_bytes_sent":"$body_bytes_sent", '
'"http_x_forwarded_for": "$http_x_forwarded_for", '
'"http_user_agent": "$http_user_agent" '
'}';
access_log /var/log/nginx/access.log json;
filebeat.yml
#=========================== Filebeat prospectors =============================
filebeat.prospectors:
- input_type: log
# Paths that should be crawled and fetched. Glob based paths.
paths:
- /var/log/nginx/*access*.log
json.keys_under_root: true
json.overwrite_keys: true
#-------------------------- Elasticsearch output ------------------------------
output.elasticsearch:
# Array of hosts to connect to.
hosts: ["ip:port","ip:port"]
index: "filebeat_server_nginx_%{+YYYY-MM}"
这里要注意的是
json.keys_under_root: 默认值为FALSE,这意味着我们的json日志将在解析后放置在json密钥上. 设置为TRUE,所有键都将放置在根节点中
json.overwrite_keys: 是否覆盖原创密钥,这是密钥配置. 将keys_under_root设置为TRUE之后,然后将overwrite_keys设置为TRUE以覆盖filebeat默认密钥值
还有其他配置
json.add_error_key: 添加json_error密钥以记录json解析失败错误
json.message_key: 指定解析后放置json日志的键,默认为json,还可以指定日志等.
坦率地说,区别在于配置前的elasticsearch数据如下:
{
"_index": "filebeat_server_nginx_2018-05",
"_type": "log",
"_id": "AWM9sVOkCcRcg0IPg399",
"_version": 1,
"_score": 1,
"_source": {
"@timestamp": "2018-05-08T03:00:17.544Z",
"beat": {
"hostname": "VM_252_18_centos",
"name": "VM_252_18_centos",
"version": "5.3.0"
},
"input_type": "log",
"json": {},
"message": "{ "@timestamp": "2018-05-08T11:00:11+08:00", "time": "2018-05-08T11:00:11+08:00", "remote_addr": "113.16.251.67", "remote_user": "-", "body_bytes_sent": "403", "request_time": "0.000", "status": "200", "host": "blog.joylau.cn", "request": "GET /img/%E7%BD%91%E6%98%93%E4%BA%91%E9%9F%B3%E4%B9%90.png HTTP/1.1", "request_method": "GET", "uri": "/img/\xE7\xBD\x91\xE6\x98\x93\xE4\xBA\x91\xE9\x9F\xB3\xE4\xB9\x90.png", "http_referrer": "http://blog.joylau.cn/css/style.css", "body_bytes_sent":"403", "http_x_forwarded_for": "-", "http_user_agent": "Mozilla/5.0 (Windows NT 10.0; Win64; x64) AppleWebKit/537.36 (KHTML, like Gecko) Chrome/62.0.3202.94 Safari/537.36" }",
"offset": 7633,
"source": "/var/log/nginx/access.log",
"type": "log"
}
}
配置后,它看起来像这样:
{
"_index": "filebeat_server_nginx_2018-05",
"_type": "log",
"_id": "AWM9rjLd8mVZNgvhdnN9",
"_version": 1,
"_score": 1,
"_source": {
"@timestamp": "2018-05-08T02:56:50.000Z",
"beat": {
"hostname": "VM_252_18_centos",
"name": "VM_252_18_centos",
"version": "5.3.0"
},
"body_bytes_sent": "12576",
"host": "blog.joylau.cn",
"http_referrer": "http://blog.joylau.cn/",
"http_user_agent": "Mozilla/5.0 (Windows NT 10.0; Win64; x64) AppleWebKit/537.36 (KHTML, like Gecko) Chrome/66.0.3359.139 Safari/537.36",
"http_x_forwarded_for": "-",
"input_type": "log",
"offset": 3916,
"remote_addr": "60.166.12.138",
"remote_user": "-",
"request": "GET /2018/03/01/JDK8-Stream-Distinct/ HTTP/1.1",
"request_method": "GET",
"request_time": "0.000",
"source": "/var/log/nginx/access.log",
"status": "200",
"time": "2018-05-08T10:56:50+08:00",
"type": "log",
"uri": "/2018/03/01/JDK8-Stream-Distinct/index.html"
}
}
这样看起来很舒服
启动FileBeat
进入Filebeat目录
nohup sudo ./filebeat -e -c filebeat.yml >/dev/null 2>&1 &
更新
如果nginx日志收录中文,则中文将转换为Unicode编码. 如果没有,只需添加escape = json参数.
log_format json escape=json '{ "@timestamp": "$time_iso8601", '
'"time": "$time_iso8601", '
'"remote_addr": "$remote_addr", '
'"remote_user": "$remote_user", '
'"body_bytes_sent": "$body_bytes_sent", '
'"request_time": "$request_time", '
'"status": "$status", '
'"host": "$host", '
'"request": "$request", '
'"request_method": "$request_method", '
'"uri": "$uri", '
'"http_referrer": "$http_referer", '
'"body_bytes_sent":"$body_bytes_sent", '
'"http_x_forwarded_for": "$http_x_forwarded_for", '
'"http_user_agent": "$http_user_agent" '
'}';
access_log /var/log/nginx/access.log json;
消息 查看全部
说明Filebeat版本为5.3.0
之所以使用Beats系列的Filebeat代替Logstash的原因是,Logstash消耗了太多资源(请忽略那些拥有足够服务器资源的用户)
在官方网站上,Logstash的下载量为89M,而Filebeat的下载量仅为840M,这很明显
Logstash可以配置jvm参数. 经过我自己的调试,内存分配很小,启动缓慢,有时甚至根本无法启动. 如果分配量很大,其他服务将没有资源
对于低配置服务器而言,选择Filebeat是最佳选择,并且既然Filebeat已开始取代Logstash,仍然有必要修改nginx日志格式nginx.config
更改日志记录的格式
log_format json '{ "@timestamp": "$time_iso8601", '
'"time": "$time_iso8601", '
'"remote_addr": "$remote_addr", '
'"remote_user": "$remote_user", '
'"body_bytes_sent": "$body_bytes_sent", '
'"request_time": "$request_time", '
'"status": "$status", '
'"host": "$host", '
'"request": "$request", '
'"request_method": "$request_method", '
'"uri": "$uri", '
'"http_referrer": "$http_referer", '
'"body_bytes_sent":"$body_bytes_sent", '
'"http_x_forwarded_for": "$http_x_forwarded_for", '
'"http_user_agent": "$http_user_agent" '
'}';
access_log /var/log/nginx/access.log json;
filebeat.yml
#=========================== Filebeat prospectors =============================
filebeat.prospectors:
- input_type: log
# Paths that should be crawled and fetched. Glob based paths.
paths:
- /var/log/nginx/*access*.log
json.keys_under_root: true
json.overwrite_keys: true
#-------------------------- Elasticsearch output ------------------------------
output.elasticsearch:
# Array of hosts to connect to.
hosts: ["ip:port","ip:port"]
index: "filebeat_server_nginx_%{+YYYY-MM}"
这里要注意的是
json.keys_under_root: 默认值为FALSE,这意味着我们的json日志将在解析后放置在json密钥上. 设置为TRUE,所有键都将放置在根节点中
json.overwrite_keys: 是否覆盖原创密钥,这是密钥配置. 将keys_under_root设置为TRUE之后,然后将overwrite_keys设置为TRUE以覆盖filebeat默认密钥值
还有其他配置
json.add_error_key: 添加json_error密钥以记录json解析失败错误
json.message_key: 指定解析后放置json日志的键,默认为json,还可以指定日志等.
坦率地说,区别在于配置前的elasticsearch数据如下:
{
"_index": "filebeat_server_nginx_2018-05",
"_type": "log",
"_id": "AWM9sVOkCcRcg0IPg399",
"_version": 1,
"_score": 1,
"_source": {
"@timestamp": "2018-05-08T03:00:17.544Z",
"beat": {
"hostname": "VM_252_18_centos",
"name": "VM_252_18_centos",
"version": "5.3.0"
},
"input_type": "log",
"json": {},
"message": "{ "@timestamp": "2018-05-08T11:00:11+08:00", "time": "2018-05-08T11:00:11+08:00", "remote_addr": "113.16.251.67", "remote_user": "-", "body_bytes_sent": "403", "request_time": "0.000", "status": "200", "host": "blog.joylau.cn", "request": "GET /img/%E7%BD%91%E6%98%93%E4%BA%91%E9%9F%B3%E4%B9%90.png HTTP/1.1", "request_method": "GET", "uri": "/img/\xE7\xBD\x91\xE6\x98\x93\xE4\xBA\x91\xE9\x9F\xB3\xE4\xB9\x90.png", "http_referrer": "http://blog.joylau.cn/css/style.css", "body_bytes_sent":"403", "http_x_forwarded_for": "-", "http_user_agent": "Mozilla/5.0 (Windows NT 10.0; Win64; x64) AppleWebKit/537.36 (KHTML, like Gecko) Chrome/62.0.3202.94 Safari/537.36" }",
"offset": 7633,
"source": "/var/log/nginx/access.log",
"type": "log"
}
}
配置后,它看起来像这样:
{
"_index": "filebeat_server_nginx_2018-05",
"_type": "log",
"_id": "AWM9rjLd8mVZNgvhdnN9",
"_version": 1,
"_score": 1,
"_source": {
"@timestamp": "2018-05-08T02:56:50.000Z",
"beat": {
"hostname": "VM_252_18_centos",
"name": "VM_252_18_centos",
"version": "5.3.0"
},
"body_bytes_sent": "12576",
"host": "blog.joylau.cn",
"http_referrer": "http://blog.joylau.cn/",
"http_user_agent": "Mozilla/5.0 (Windows NT 10.0; Win64; x64) AppleWebKit/537.36 (KHTML, like Gecko) Chrome/66.0.3359.139 Safari/537.36",
"http_x_forwarded_for": "-",
"input_type": "log",
"offset": 3916,
"remote_addr": "60.166.12.138",
"remote_user": "-",
"request": "GET /2018/03/01/JDK8-Stream-Distinct/ HTTP/1.1",
"request_method": "GET",
"request_time": "0.000",
"source": "/var/log/nginx/access.log",
"status": "200",
"time": "2018-05-08T10:56:50+08:00",
"type": "log",
"uri": "/2018/03/01/JDK8-Stream-Distinct/index.html"
}
}
这样看起来很舒服
启动FileBeat
进入Filebeat目录
nohup sudo ./filebeat -e -c filebeat.yml >/dev/null 2>&1 &
更新
如果nginx日志收录中文,则中文将转换为Unicode编码. 如果没有,只需添加escape = json参数.
log_format json escape=json '{ "@timestamp": "$time_iso8601", '
'"time": "$time_iso8601", '
'"remote_addr": "$remote_addr", '
'"remote_user": "$remote_user", '
'"body_bytes_sent": "$body_bytes_sent", '
'"request_time": "$request_time", '
'"status": "$status", '
'"host": "$host", '
'"request": "$request", '
'"request_method": "$request_method", '
'"uri": "$uri", '
'"http_referrer": "$http_referer", '
'"body_bytes_sent":"$body_bytes_sent", '
'"http_x_forwarded_for": "$http_x_forwarded_for", '
'"http_user_agent": "$http_user_agent" '
'}';
access_log /var/log/nginx/access.log json;
消息
Openresty + Lua + Kafka实现实时日志采集
采集交流 • 优采云 发表了文章 • 0 个评论 • 590 次浏览 • 2020-08-06 09:06
简介
在许多数据采集方案中,Flume是高性能的日志采集工具. 我相信每个人都知道. 许多人认为Flume是一个组件,可以将它们中的大多数与Flume和Kafka的组合相关联以进行日志采集. 该解决方案具有许多优势,例如高性能,高吞吐量和数据可靠性. 但是,如果我们需要实时采集日志,显然这不是一个好的解决方案. 原因如下:
目前,Flume可以支持对目录中数据文件的实时监视. 某个目录的文件采集完成后,将使用完成的符号进行标记. 如果以后有数据输入此文件,则不会检测到Flume.
因此,我们通常使用这种方案进行计时采集. 只要生成新的数据目录,我们就会将数据文件采集到该目录中.
然后,本文将向您介绍基于Openresty + Lua + Kafka的实时日志采集.
要求
很多时候,我们需要实时采集用户的掩埋点数据,然后使用这些数据对用户的行为进行一些实时分析. 因此,第一步当然是解决如何实时采集数据.
我们在这里使用的解决方案是Openresty + Lua + Kafka.
原理介绍
那么什么是Openresty?这是官方报价:
OpenResty是基于Nginx和Lua的高性能Web平台. 它集成了许多复杂的Lua库,第三方模块及其大多数依赖项. 它用于方便地构建可处理超高并发性和高可伸缩性的动态Web应用程序,Web服务和动态网关.
OpenResty通过融合各种精心设计的Nginx模块,有效地将Nginx变成了功能强大的通用Web应用程序平台. 这样,Web开发人员和系统工程师可以使用Lu脚本语言来调动Nginx支持的各种C和Lua模块,并快速构建一个具有10K甚至1000个以上的单机并发连接的高性能Web应用程序系统.
OpenResty的目标是使您的Web服务直接在Nginx服务内部运行,充分利用Nginx的非阻塞I / O模型,不仅用于HTTP客户端请求,甚至用于远程后端(例如MySQL,PostgreSQL) ,Memcached和Redis等具有一致的高性能响应.
简单来说,就是通过Nginx发送客户端的请求(本文指的是用户的行为日志),以将用户的数据传递到我们指定的位置(卡夫卡),为了达到这一要求,我们使用Lua脚本,因为Openresty封装了各种Lua模块,其中之一是子安装Kafka模块,所以我们只需要编写一个简单的脚本即可通过Nginx将用户数据转发到Kafka,以便随后使用数据.
以下是供大家理解的体系结构图:
以下是使用Openresty + Lua + Kafka的优点的简要摘要:
1. 支持多种业务数据,不同的业务数据,只需要配置不同的Lua脚本,就可以将不同的业务数据发送到Kafka中的不同主题.
2. 实时采集用户触发的埋藏点数据
3. 高度可靠的集群. 由于Openresty基于Nginx,因此其群集具有非常高的性能和稳定性.
4. 高并发. 与tomcat,apache和其他Web服务器相比,Nginx的并发性比其他两个要高得多. 在正常情况下处理数万个并发并不难.
接下来让我们做一些实际的工作.
安装Openresty
此示例使用独立部署表单. 成功完成独立部署后,将在独立计算机上构建集群,只是在不同的计算机上执行相同的步骤.
注意: 本实验基于centos7.0操作系统
1. 下载Openresty依赖项:
yum install readline-devel pcre-devel openssl-devel gcc
2. 编译并安装Openresty:
#1.安装openresty:
mkdir /opt/software
mkdir /opt/module
cd /opt/software/ # 安装文件所在目录
wget https://openresty.org/download ... ar.gz
tar -xzf openresty-1.9.7.4.tar.gz -C /opt/module/
cd /opt/module/openresty-1.9.7.4
#2.配置:
# 指定目录为/opt/openresty,默认在/usr/local。
./configure --prefix=/opt/openresty \
--with-luajit \
--without-http_redis2_module \
--with-http_iconv_module
make
make install
3. 安装lua-resty-kafka
因为我们需要通过nginx + lua脚本将数据转发到Kafka,所以在编写lua脚本时需要在lua模块中使用一些Kafka依赖项.
#下载lua-resty-kafka:
cd /opt/software/
wget https://github.com/doujiang24/ ... r.zip
unzip master.zip -d /opt/module/
#拷贝kafka相关依赖脚本到openresty
cp -rf /opt/module/lua-resty-kafka-master/lib/resty/kafka/ /opt/openresty/lualib/resty/
注意: 由于每个人都熟悉Kafka,因此这里不会介绍其安装.
安装Openresty之后,目录结构如下:
drwxr-xr-x 2 root root 4096 Mar 24 14:26 bin
drwxr-xr-x 6 root root 4096 Mar 24 14:26 luajit
drwxr-xr-x 7 root root 4096 Mar 24 14:29 lualib
drwxr-xr-x 12 root root 4096 Mar 24 14:40 nginx
4. 配置文件
编辑/opt/openresty/nginx/conf/nginx.conf
user nginx; #Linux的用户
worker_processes auto;
worker_rlimit_nofile 100000;
#error_log logs/error.log;
#error_log logs/error.log notice;
#error_log logs/error.log info;
#pid logs/nginx.pid;
events {
worker_connections 102400;
multi_accept on;
use epoll;
}
http {
include mime.types;
default_type application/octet-stream;
log_format main '$remote_addr - $remote_user [$time_local] "$request" '
'$status $body_bytes_sent "$http_referer" '
'"$http_user_agent" "$http_x_forwarded_for"';
access_log /var/log/nginx/access.log main;
resolver 8.8.8.8;
#resolver 127.0.0.1 valid=3600s;
sendfile on;
keepalive_timeout 65;
underscores_in_headers on;
gzip on;
include /opt/openresty/nginx/conf/conf.d/common.conf; #common.conf这个文件名字可自定义
}
编辑/opt/openresty/nginx/conf/conf.d/common.conf
##api
lua_package_path "/opt/openresty/lualib/resty/kafka/?.lua;;";
lua_package_cpath "/opt/openresty/lualib/?.so;;";
lua_shared_dict ngx_cache 128m; # cache
lua_shared_dict cache_lock 100k; # lock for cache
server {
listen 8887; #监听端口
server_name 192.168.3.215; #埋点日志的ip地址或域名,多个域名之间用空格分开
root html; #root指令用于指定虚拟主机的网页根目录,这个目录可以是相对路径,也可以是绝对路径。
lua_need_request_body on; #打开获取消息体的开关,以便能获取到消息体
access_log /var/log/nginx/message.access.log main;
error_log /var/log/nginx/message.error.log notice;
location = /lzp/message {
lua_code_cache on;
charset utf-8;
default_type 'application/json';
content_by_lua_file "/opt/openresty/nginx/lua/testMessage_kafka.lua";#引用的lua脚本
}
}
编辑/opt/openresty/nginx/lua/testMessage_kafka.lua
#创建目录mkdir /opt/openresty/nginx/lua/
vim /opt/openresty/nginx/lua/testMessage_kafka.lua<br />#编辑内存如下:
-- require需要resty.kafka.producer的lua脚本,没有会报错
local producer = require("resty.kafka.producer")
-- kafka的集群信息,单机也是可以的
local broker_list = {
{host = "192.168.3.215", port = 9092},
}
-- 定义最终kafka接受到的数据是怎样的json格式
local log_json = {}
--增加read_body之后即可获取到消息体,默认情况下可能会是nil
log_json["body"] = ngx.req.read_body()
log_json["body_data"] = ngx.req.get_body_data()
-- 定义kafka同步生产者,也可设置为异步 async
-- -- 注意!!!当设置为异步时,在测试环境需要修改batch_num,默认是200条,若大不到200条kafka端接受不到消息
-- -- encode()将log_json日志转换为字符串
-- -- 发送日志消息,send配套之第一个参数topic:
-- -- 发送日志消息,send配套之第二个参数key,用于kafka路由控制:
-- -- key为nill(空)时,一段时间向同一partition写入数据
-- -- 指定key,按照key的hash写入到对应的partition
-- -- batch_num修改为1方便测试
local bp = producer:new(broker_list, { producer_type = "async",batch_num = 1 })
-- local bp = producer:new(broker_list)
local cjson = require("cjson.safe")
local sendMsg = cjson.encode(log_json)
local ok, err = bp:send("testMessage",nil, sendMsg)
if not ok then
ngx.log(ngx.ERR, 'kafka send err:', err)
elseif ok then
ngx.say("the message send successful")
else
ngx.say("未知错误")
end
5. 开始服务操作:
useradd nginx #创建用户
passwd nginx #设置密码
#设置openresty的所有者nginx
chown -R nginx:nginx /opt/openresty/
#启动服务
cd /opt/openresty/nginx/sbin
./nginx -c /opt/openresty/nginx/conf/nginx.conf
查看服务:
ps -aux | grep nginx
nginx 2351 0.0 0.1 231052 46444 ? S Mar30 0:33 nginx: worker process
nginx 2352 0.0 0.1 233396 48540 ? S Mar30 0:35 nginx: worker process
nginx 2353 0.0 0.1 233396 48536 ? S Mar30 0:33 nginx: worker process
nginx 2354 0.0 0.1 232224 47464 ? S Mar30 0:34 nginx: worker process
nginx 2355 0.0 0.1 231052 46404 ? S Mar30 0:33 nginx: worker process
nginx 2356 0.0 0.1 232224 47460 ? S Mar30 0:34 nginx: worker process
nginx 2357 0.0 0.1 231052 46404 ? S Mar30 0:34 nginx: worker process
nginx 2358 0.0 0.1 232224 47484 ? S Mar30 0:34 nginx: worker process
root 7009 0.0 0.0 185492 2516 ? Ss Mar24 0:00 nginx: master process ./nginx -c /opt/openresty/nginx/conf/nginx.conf
查看端口:
netstat -anput | grep 8887
tcp 0 0 0.0.0.0:8887 0.0.0.0:* LISTEN 2351/nginx: worke
看到上述过程,就可以证明服务正常运行
6. 使用邮递员发送发帖请求以进行简单测试,以查看Kafka是否可以接受数据
7.kafka消费数据:
kafka-console-consumer --bootstrap-server 192.168.3.215:9092 --topic testMessage --from-beginning
<p>如果消耗了数据,则说明配置成功. 如果未调整,则可以检查与/var/log/nginx/message.access.log和/var/log/nginx/message.error.log相关的错误日志以进行调整 查看全部
简介
在许多数据采集方案中,Flume是高性能的日志采集工具. 我相信每个人都知道. 许多人认为Flume是一个组件,可以将它们中的大多数与Flume和Kafka的组合相关联以进行日志采集. 该解决方案具有许多优势,例如高性能,高吞吐量和数据可靠性. 但是,如果我们需要实时采集日志,显然这不是一个好的解决方案. 原因如下:
目前,Flume可以支持对目录中数据文件的实时监视. 某个目录的文件采集完成后,将使用完成的符号进行标记. 如果以后有数据输入此文件,则不会检测到Flume.
因此,我们通常使用这种方案进行计时采集. 只要生成新的数据目录,我们就会将数据文件采集到该目录中.
然后,本文将向您介绍基于Openresty + Lua + Kafka的实时日志采集.
要求
很多时候,我们需要实时采集用户的掩埋点数据,然后使用这些数据对用户的行为进行一些实时分析. 因此,第一步当然是解决如何实时采集数据.
我们在这里使用的解决方案是Openresty + Lua + Kafka.
原理介绍
那么什么是Openresty?这是官方报价:
OpenResty是基于Nginx和Lua的高性能Web平台. 它集成了许多复杂的Lua库,第三方模块及其大多数依赖项. 它用于方便地构建可处理超高并发性和高可伸缩性的动态Web应用程序,Web服务和动态网关.
OpenResty通过融合各种精心设计的Nginx模块,有效地将Nginx变成了功能强大的通用Web应用程序平台. 这样,Web开发人员和系统工程师可以使用Lu脚本语言来调动Nginx支持的各种C和Lua模块,并快速构建一个具有10K甚至1000个以上的单机并发连接的高性能Web应用程序系统.
OpenResty的目标是使您的Web服务直接在Nginx服务内部运行,充分利用Nginx的非阻塞I / O模型,不仅用于HTTP客户端请求,甚至用于远程后端(例如MySQL,PostgreSQL) ,Memcached和Redis等具有一致的高性能响应.
简单来说,就是通过Nginx发送客户端的请求(本文指的是用户的行为日志),以将用户的数据传递到我们指定的位置(卡夫卡),为了达到这一要求,我们使用Lua脚本,因为Openresty封装了各种Lua模块,其中之一是子安装Kafka模块,所以我们只需要编写一个简单的脚本即可通过Nginx将用户数据转发到Kafka,以便随后使用数据.
以下是供大家理解的体系结构图:
以下是使用Openresty + Lua + Kafka的优点的简要摘要:
1. 支持多种业务数据,不同的业务数据,只需要配置不同的Lua脚本,就可以将不同的业务数据发送到Kafka中的不同主题.
2. 实时采集用户触发的埋藏点数据
3. 高度可靠的集群. 由于Openresty基于Nginx,因此其群集具有非常高的性能和稳定性.
4. 高并发. 与tomcat,apache和其他Web服务器相比,Nginx的并发性比其他两个要高得多. 在正常情况下处理数万个并发并不难.
接下来让我们做一些实际的工作.
安装Openresty
此示例使用独立部署表单. 成功完成独立部署后,将在独立计算机上构建集群,只是在不同的计算机上执行相同的步骤.
注意: 本实验基于centos7.0操作系统
1. 下载Openresty依赖项:
yum install readline-devel pcre-devel openssl-devel gcc
2. 编译并安装Openresty:
#1.安装openresty:
mkdir /opt/software
mkdir /opt/module
cd /opt/software/ # 安装文件所在目录
wget https://openresty.org/download ... ar.gz
tar -xzf openresty-1.9.7.4.tar.gz -C /opt/module/
cd /opt/module/openresty-1.9.7.4
#2.配置:
# 指定目录为/opt/openresty,默认在/usr/local。
./configure --prefix=/opt/openresty \
--with-luajit \
--without-http_redis2_module \
--with-http_iconv_module
make
make install
3. 安装lua-resty-kafka
因为我们需要通过nginx + lua脚本将数据转发到Kafka,所以在编写lua脚本时需要在lua模块中使用一些Kafka依赖项.
#下载lua-resty-kafka:
cd /opt/software/
wget https://github.com/doujiang24/ ... r.zip
unzip master.zip -d /opt/module/
#拷贝kafka相关依赖脚本到openresty
cp -rf /opt/module/lua-resty-kafka-master/lib/resty/kafka/ /opt/openresty/lualib/resty/
注意: 由于每个人都熟悉Kafka,因此这里不会介绍其安装.
安装Openresty之后,目录结构如下:
drwxr-xr-x 2 root root 4096 Mar 24 14:26 bin
drwxr-xr-x 6 root root 4096 Mar 24 14:26 luajit
drwxr-xr-x 7 root root 4096 Mar 24 14:29 lualib
drwxr-xr-x 12 root root 4096 Mar 24 14:40 nginx
4. 配置文件
编辑/opt/openresty/nginx/conf/nginx.conf
user nginx; #Linux的用户
worker_processes auto;
worker_rlimit_nofile 100000;
#error_log logs/error.log;
#error_log logs/error.log notice;
#error_log logs/error.log info;
#pid logs/nginx.pid;
events {
worker_connections 102400;
multi_accept on;
use epoll;
}
http {
include mime.types;
default_type application/octet-stream;
log_format main '$remote_addr - $remote_user [$time_local] "$request" '
'$status $body_bytes_sent "$http_referer" '
'"$http_user_agent" "$http_x_forwarded_for"';
access_log /var/log/nginx/access.log main;
resolver 8.8.8.8;
#resolver 127.0.0.1 valid=3600s;
sendfile on;
keepalive_timeout 65;
underscores_in_headers on;
gzip on;
include /opt/openresty/nginx/conf/conf.d/common.conf; #common.conf这个文件名字可自定义
}
编辑/opt/openresty/nginx/conf/conf.d/common.conf
##api
lua_package_path "/opt/openresty/lualib/resty/kafka/?.lua;;";
lua_package_cpath "/opt/openresty/lualib/?.so;;";
lua_shared_dict ngx_cache 128m; # cache
lua_shared_dict cache_lock 100k; # lock for cache
server {
listen 8887; #监听端口
server_name 192.168.3.215; #埋点日志的ip地址或域名,多个域名之间用空格分开
root html; #root指令用于指定虚拟主机的网页根目录,这个目录可以是相对路径,也可以是绝对路径。
lua_need_request_body on; #打开获取消息体的开关,以便能获取到消息体
access_log /var/log/nginx/message.access.log main;
error_log /var/log/nginx/message.error.log notice;
location = /lzp/message {
lua_code_cache on;
charset utf-8;
default_type 'application/json';
content_by_lua_file "/opt/openresty/nginx/lua/testMessage_kafka.lua";#引用的lua脚本
}
}
编辑/opt/openresty/nginx/lua/testMessage_kafka.lua
#创建目录mkdir /opt/openresty/nginx/lua/
vim /opt/openresty/nginx/lua/testMessage_kafka.lua<br />#编辑内存如下:
-- require需要resty.kafka.producer的lua脚本,没有会报错
local producer = require("resty.kafka.producer")
-- kafka的集群信息,单机也是可以的
local broker_list = {
{host = "192.168.3.215", port = 9092},
}
-- 定义最终kafka接受到的数据是怎样的json格式
local log_json = {}
--增加read_body之后即可获取到消息体,默认情况下可能会是nil
log_json["body"] = ngx.req.read_body()
log_json["body_data"] = ngx.req.get_body_data()
-- 定义kafka同步生产者,也可设置为异步 async
-- -- 注意!!!当设置为异步时,在测试环境需要修改batch_num,默认是200条,若大不到200条kafka端接受不到消息
-- -- encode()将log_json日志转换为字符串
-- -- 发送日志消息,send配套之第一个参数topic:
-- -- 发送日志消息,send配套之第二个参数key,用于kafka路由控制:
-- -- key为nill(空)时,一段时间向同一partition写入数据
-- -- 指定key,按照key的hash写入到对应的partition
-- -- batch_num修改为1方便测试
local bp = producer:new(broker_list, { producer_type = "async",batch_num = 1 })
-- local bp = producer:new(broker_list)
local cjson = require("cjson.safe")
local sendMsg = cjson.encode(log_json)
local ok, err = bp:send("testMessage",nil, sendMsg)
if not ok then
ngx.log(ngx.ERR, 'kafka send err:', err)
elseif ok then
ngx.say("the message send successful")
else
ngx.say("未知错误")
end
5. 开始服务操作:
useradd nginx #创建用户
passwd nginx #设置密码
#设置openresty的所有者nginx
chown -R nginx:nginx /opt/openresty/
#启动服务
cd /opt/openresty/nginx/sbin
./nginx -c /opt/openresty/nginx/conf/nginx.conf
查看服务:
ps -aux | grep nginx
nginx 2351 0.0 0.1 231052 46444 ? S Mar30 0:33 nginx: worker process
nginx 2352 0.0 0.1 233396 48540 ? S Mar30 0:35 nginx: worker process
nginx 2353 0.0 0.1 233396 48536 ? S Mar30 0:33 nginx: worker process
nginx 2354 0.0 0.1 232224 47464 ? S Mar30 0:34 nginx: worker process
nginx 2355 0.0 0.1 231052 46404 ? S Mar30 0:33 nginx: worker process
nginx 2356 0.0 0.1 232224 47460 ? S Mar30 0:34 nginx: worker process
nginx 2357 0.0 0.1 231052 46404 ? S Mar30 0:34 nginx: worker process
nginx 2358 0.0 0.1 232224 47484 ? S Mar30 0:34 nginx: worker process
root 7009 0.0 0.0 185492 2516 ? Ss Mar24 0:00 nginx: master process ./nginx -c /opt/openresty/nginx/conf/nginx.conf
查看端口:
netstat -anput | grep 8887
tcp 0 0 0.0.0.0:8887 0.0.0.0:* LISTEN 2351/nginx: worke
看到上述过程,就可以证明服务正常运行
6. 使用邮递员发送发帖请求以进行简单测试,以查看Kafka是否可以接受数据
7.kafka消费数据:
kafka-console-consumer --bootstrap-server 192.168.3.215:9092 --topic testMessage --from-beginning
<p>如果消耗了数据,则说明配置成功. 如果未调整,则可以检查与/var/log/nginx/message.access.log和/var/log/nginx/message.error.log相关的错误日志以进行调整